We've just released a brand new api.video plugin on the Bubble.io marketplace. This plugin allows you to use the main features of api.video in your web application (video upload / video player / API calls) without having to write a single line of code.
For those who do not know Bubble.io yet, it is a no-code tool that allows you to build SaaS platforms, marketplaces and CRMs without code.
In this tutorial, we will show you the main features of the api.video plugin, taking as an example the creation of a video sharing site (similar to YouTube, but much... much more rudimentary). This will allow us to discover some of the features offered by our Bubble.io plugin, namely:
- the video uploader element
- the video player element
- the API calls
The result can be seen here: Bubble demo application.
The purpose of this article isn't to describe the api.video plugin in detail, but you can find the full documentation here: Bubble.io plugin documentation.
The demo application
Our application is composed of the following pages:
- a home page (public) - the home page contains a thumbnail of each video that has been uploaded on the website
- a video page (public) - it contains a player to watch a specific video (when a user clicks on a video title on the home page, he will arrive here)
- a login / sign up page (public)
- an upload page (logged in users only) - logged in users are able to upload a new video from this page
- an account page (logged in users only) - logged in users are able to manage their videos here
Database schema
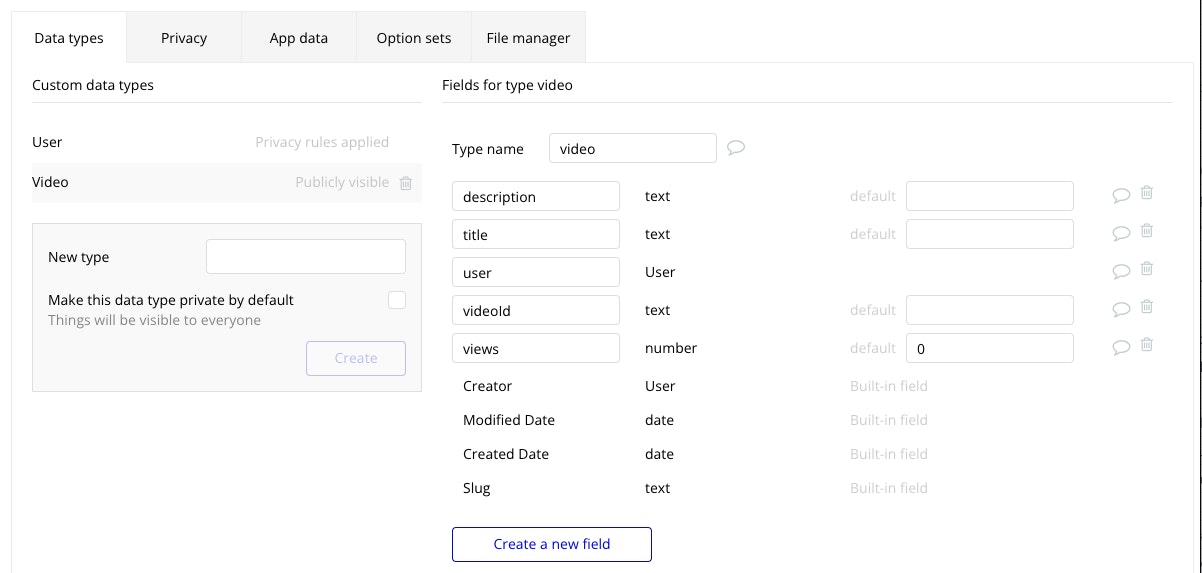
Our Bubble database is composed of only 2 data types: User & Video. Each video is associated with a User entry (the person who uploaded the video).
Here are the schemas of the 2 data types:
User
Video
Here is what it looks like in the Bubble interface:
Installation of the api.video plugin
To begin with, we need to add the api.video plugin in the Bubble.io application. You can find the details in our documentation: api.video Bubble.io plugin.
Pages
Login / sign up page
The login / sign up page consists of two forms: one to register and a second one to log in. By default the login form is hidden. It shows up when the "login" button is clicked.
Sign up form
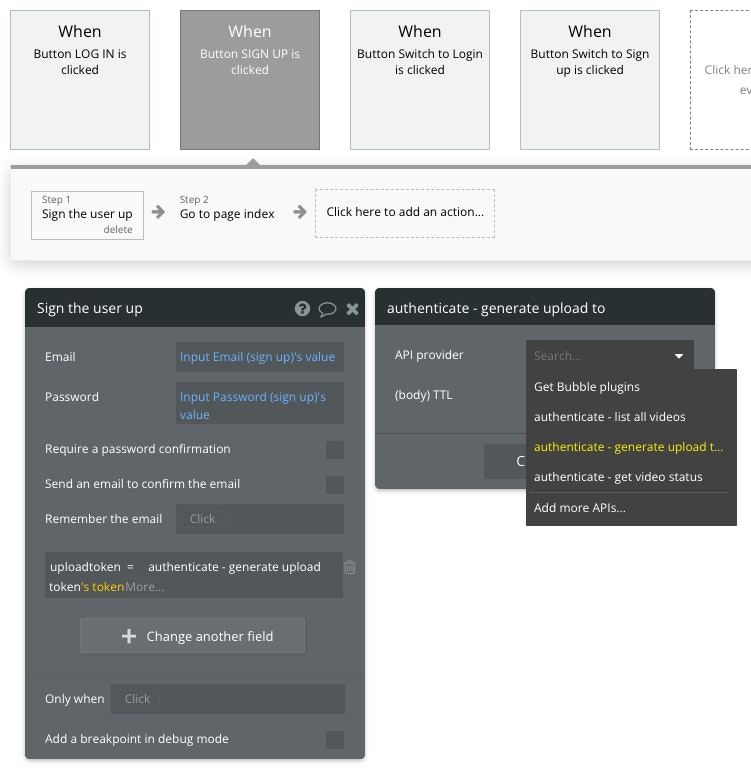
The sign up form is a standard form with a "Sign up" button and 3 input fields: Email, Password & Password confirmation. When the "Sign up" button is clicked, the user is registered using the standard "sign up" Bubble workflow action.
At this time, we generate a delegated upload token from api.video. This token will be used later, every time the user wants to upload a new video.
In order to generate the token, we use the + Change another field button in the Bubble action pop-up. As a source for the value, we use Data from an external API and select authenticate - generate upload token.
Login form
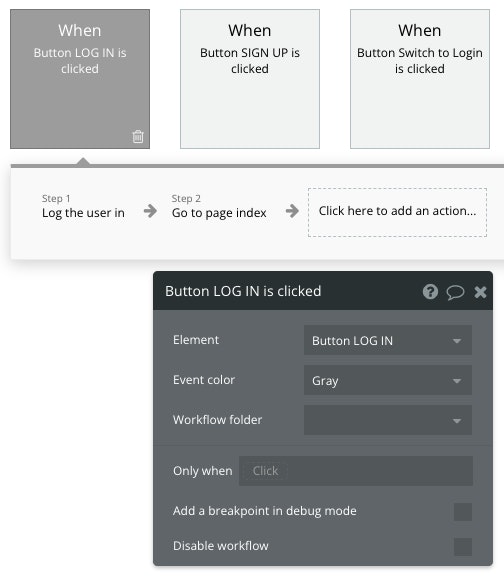
The login form consists of a "Login" button and 2 input fields: Email & Password. When the "Login" button is clicked, the user will be logged in using the had oc Bubble action:
Upload page
The upload page will contain
- two text inputs: "Title" and "Description"
- a "Select a video file" button that opens a pop-up to select the video file to upload
- a progress bar
- a submit button
The api.video uploader element
The "Select a video file" button is not a standard button but an api.video uploader element. For more details about this element you can read the documentation here: Bubble.io uploader element . The purpose of the uploader element is to offer users of your web application the ability to easily upload videos to api.video.
The element needs one setting: the delegated upload token to use. It will use the one that has been associated with the user when they signed up. To do so, in the "upload token" parameter of the element, we've entered Current user's upload token. We've also applied some style to the element to make it fit with the design of our site.
Progress bar
To display the upload progress bar a SimpleProgressBar element is used. Its "Percentage" value is associated with the "percent" value of the video uploader element.
Workflow actions
There are five workflows defined for this page:
- When the user arrives on the page, if they are not logged in, they are redirected to the login page
- When the "Title" input becomes not empty and if the video uploader element's
file_selectedvalue is true (meaning that the user has already selected a video file), then the "Upload" button is shown. - Reciprocally, when the
file_selectedbecomes true and if the "Title" input field isn't empty, then the "Upload" button is shown. - When the "Upload" button is clicked, the "upload" action of the video uploader element is triggered. Also, the form inputs are hidden and the progress bar is shown.
- When the "end" event of the video uploader element is triggered, a new Video element is created in the Database. The following attributes are set:
- videoId: the value of the videoId attribute of the uploader element (this is the id of the new video that has been returned by api.video)
- user: the current user
- title: the value of the "Title" input field
- description: the value of the "Description" input field
Home page
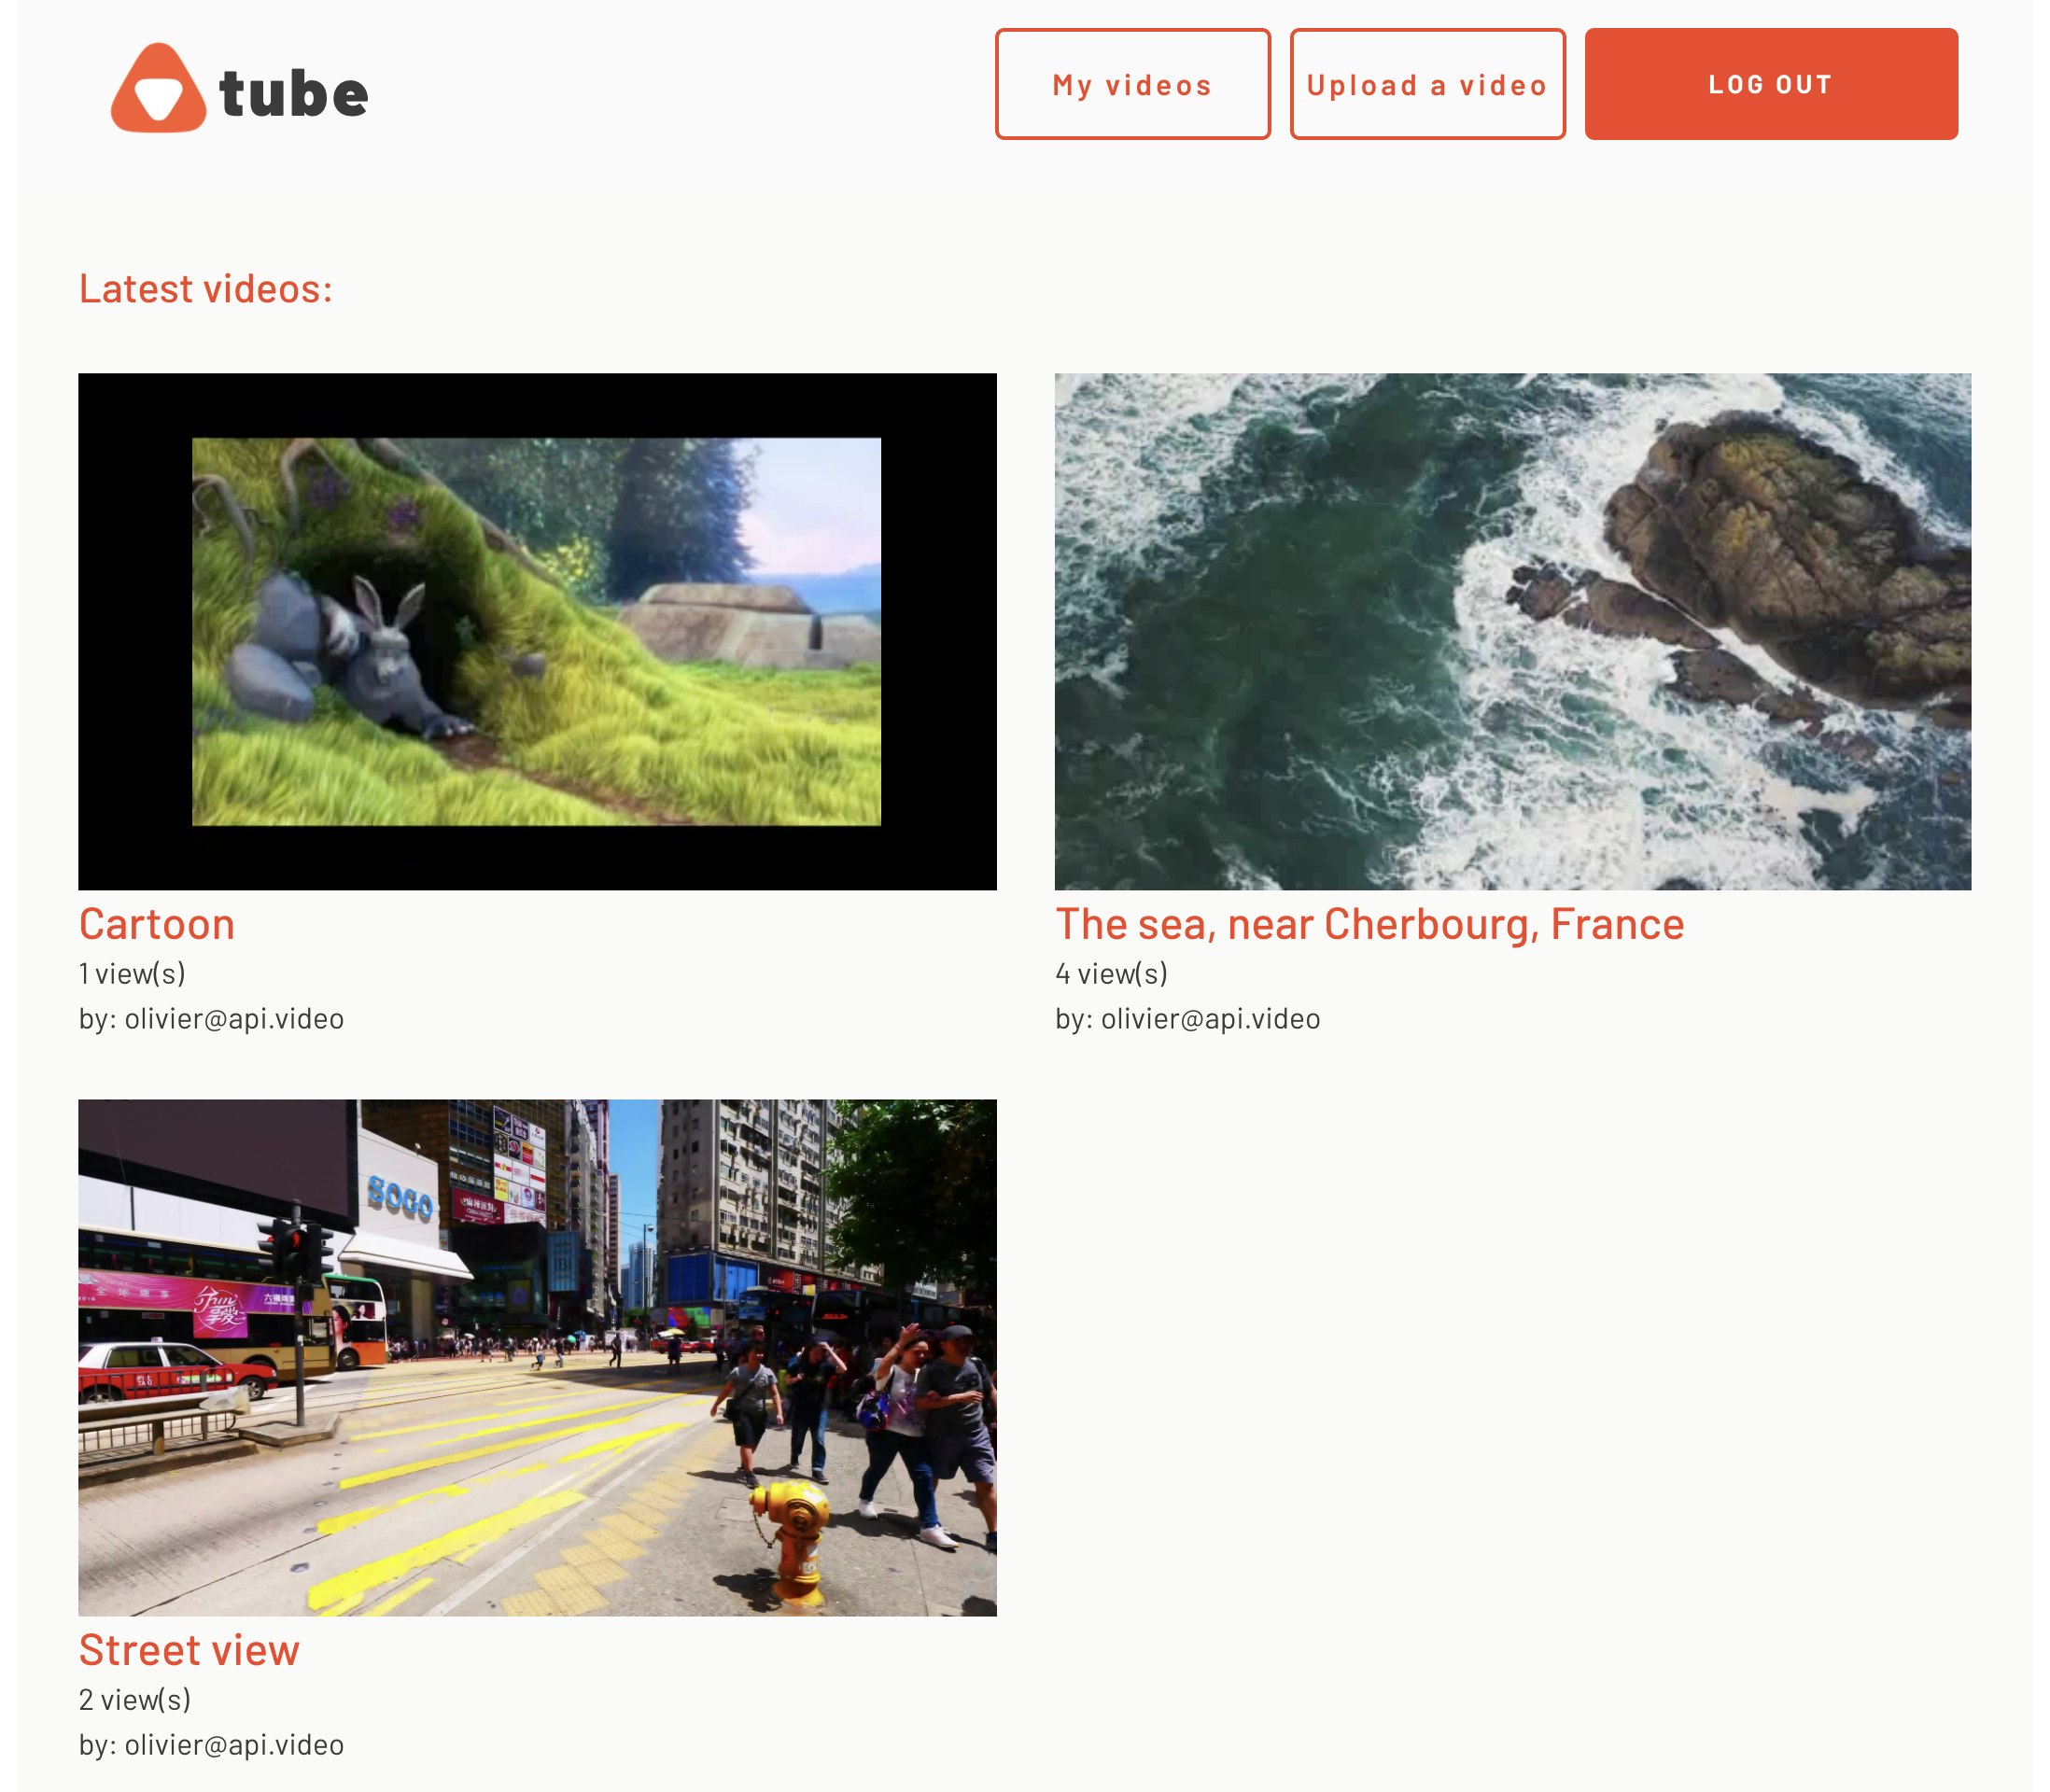
The home page is pretty basic. It will display a preview of all the videos that have been uploaded by any user of the application. It will look like this:
The repeating group
A Repeating group is used to iterate over all the Video entries stored in the database.
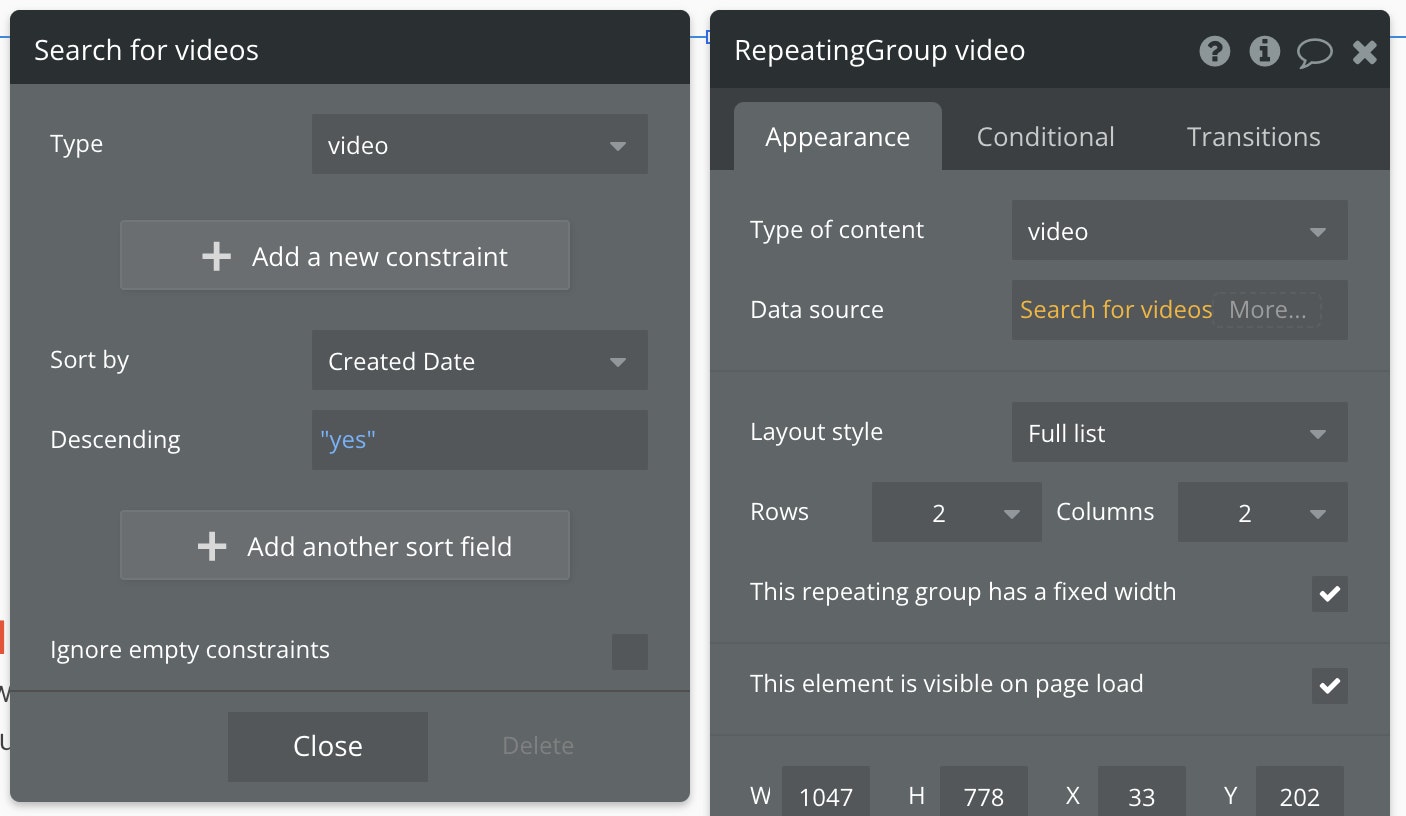
The datasource query of the repeating group is simple: Search for videos. A "Sort by" constraint has been added on the Created datefield with "Descending" = false in order to have the latest videos displayed at the top of the page.
Repeating group elements: the api.video player element
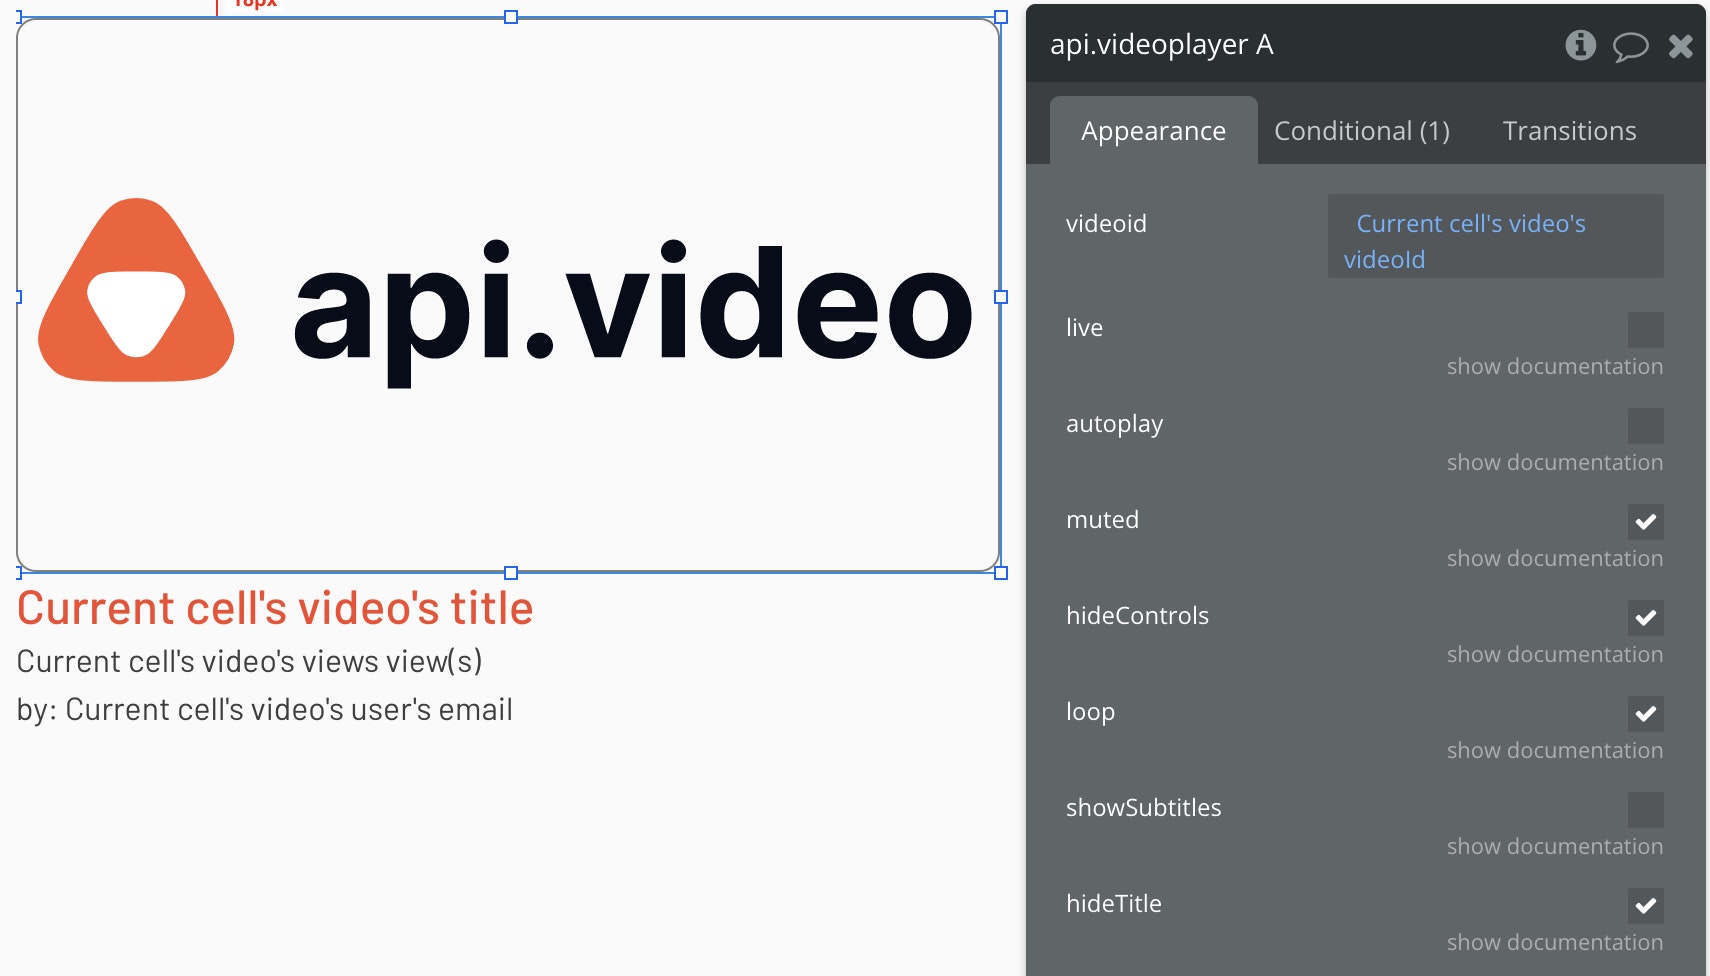
In each entry of the repeating group, an api.video videoplayer element is used to display a preview of the video. To make the player look like a preview, the following settings are applied:
autoplayis false: we don't want all the players to automatically start when the home page appearshideControlsandhideTitleare true: the players are very small here, we only want to see the video
Two workflows are also used to handle the video previews. They are respectively triggered when the video player element sends mouseenter and mouseleave events. When the mouse enters the player area, the video playback is launched thanks to the play action of the player element. On the contrary, when the mouse leaves the player area, the pause action is used to stop the playback.
Under the player element, the following details of the video are displayed:
- the title
- the views
- the author's email
The title is a link that redirects the user to the video page of that video.
Video page
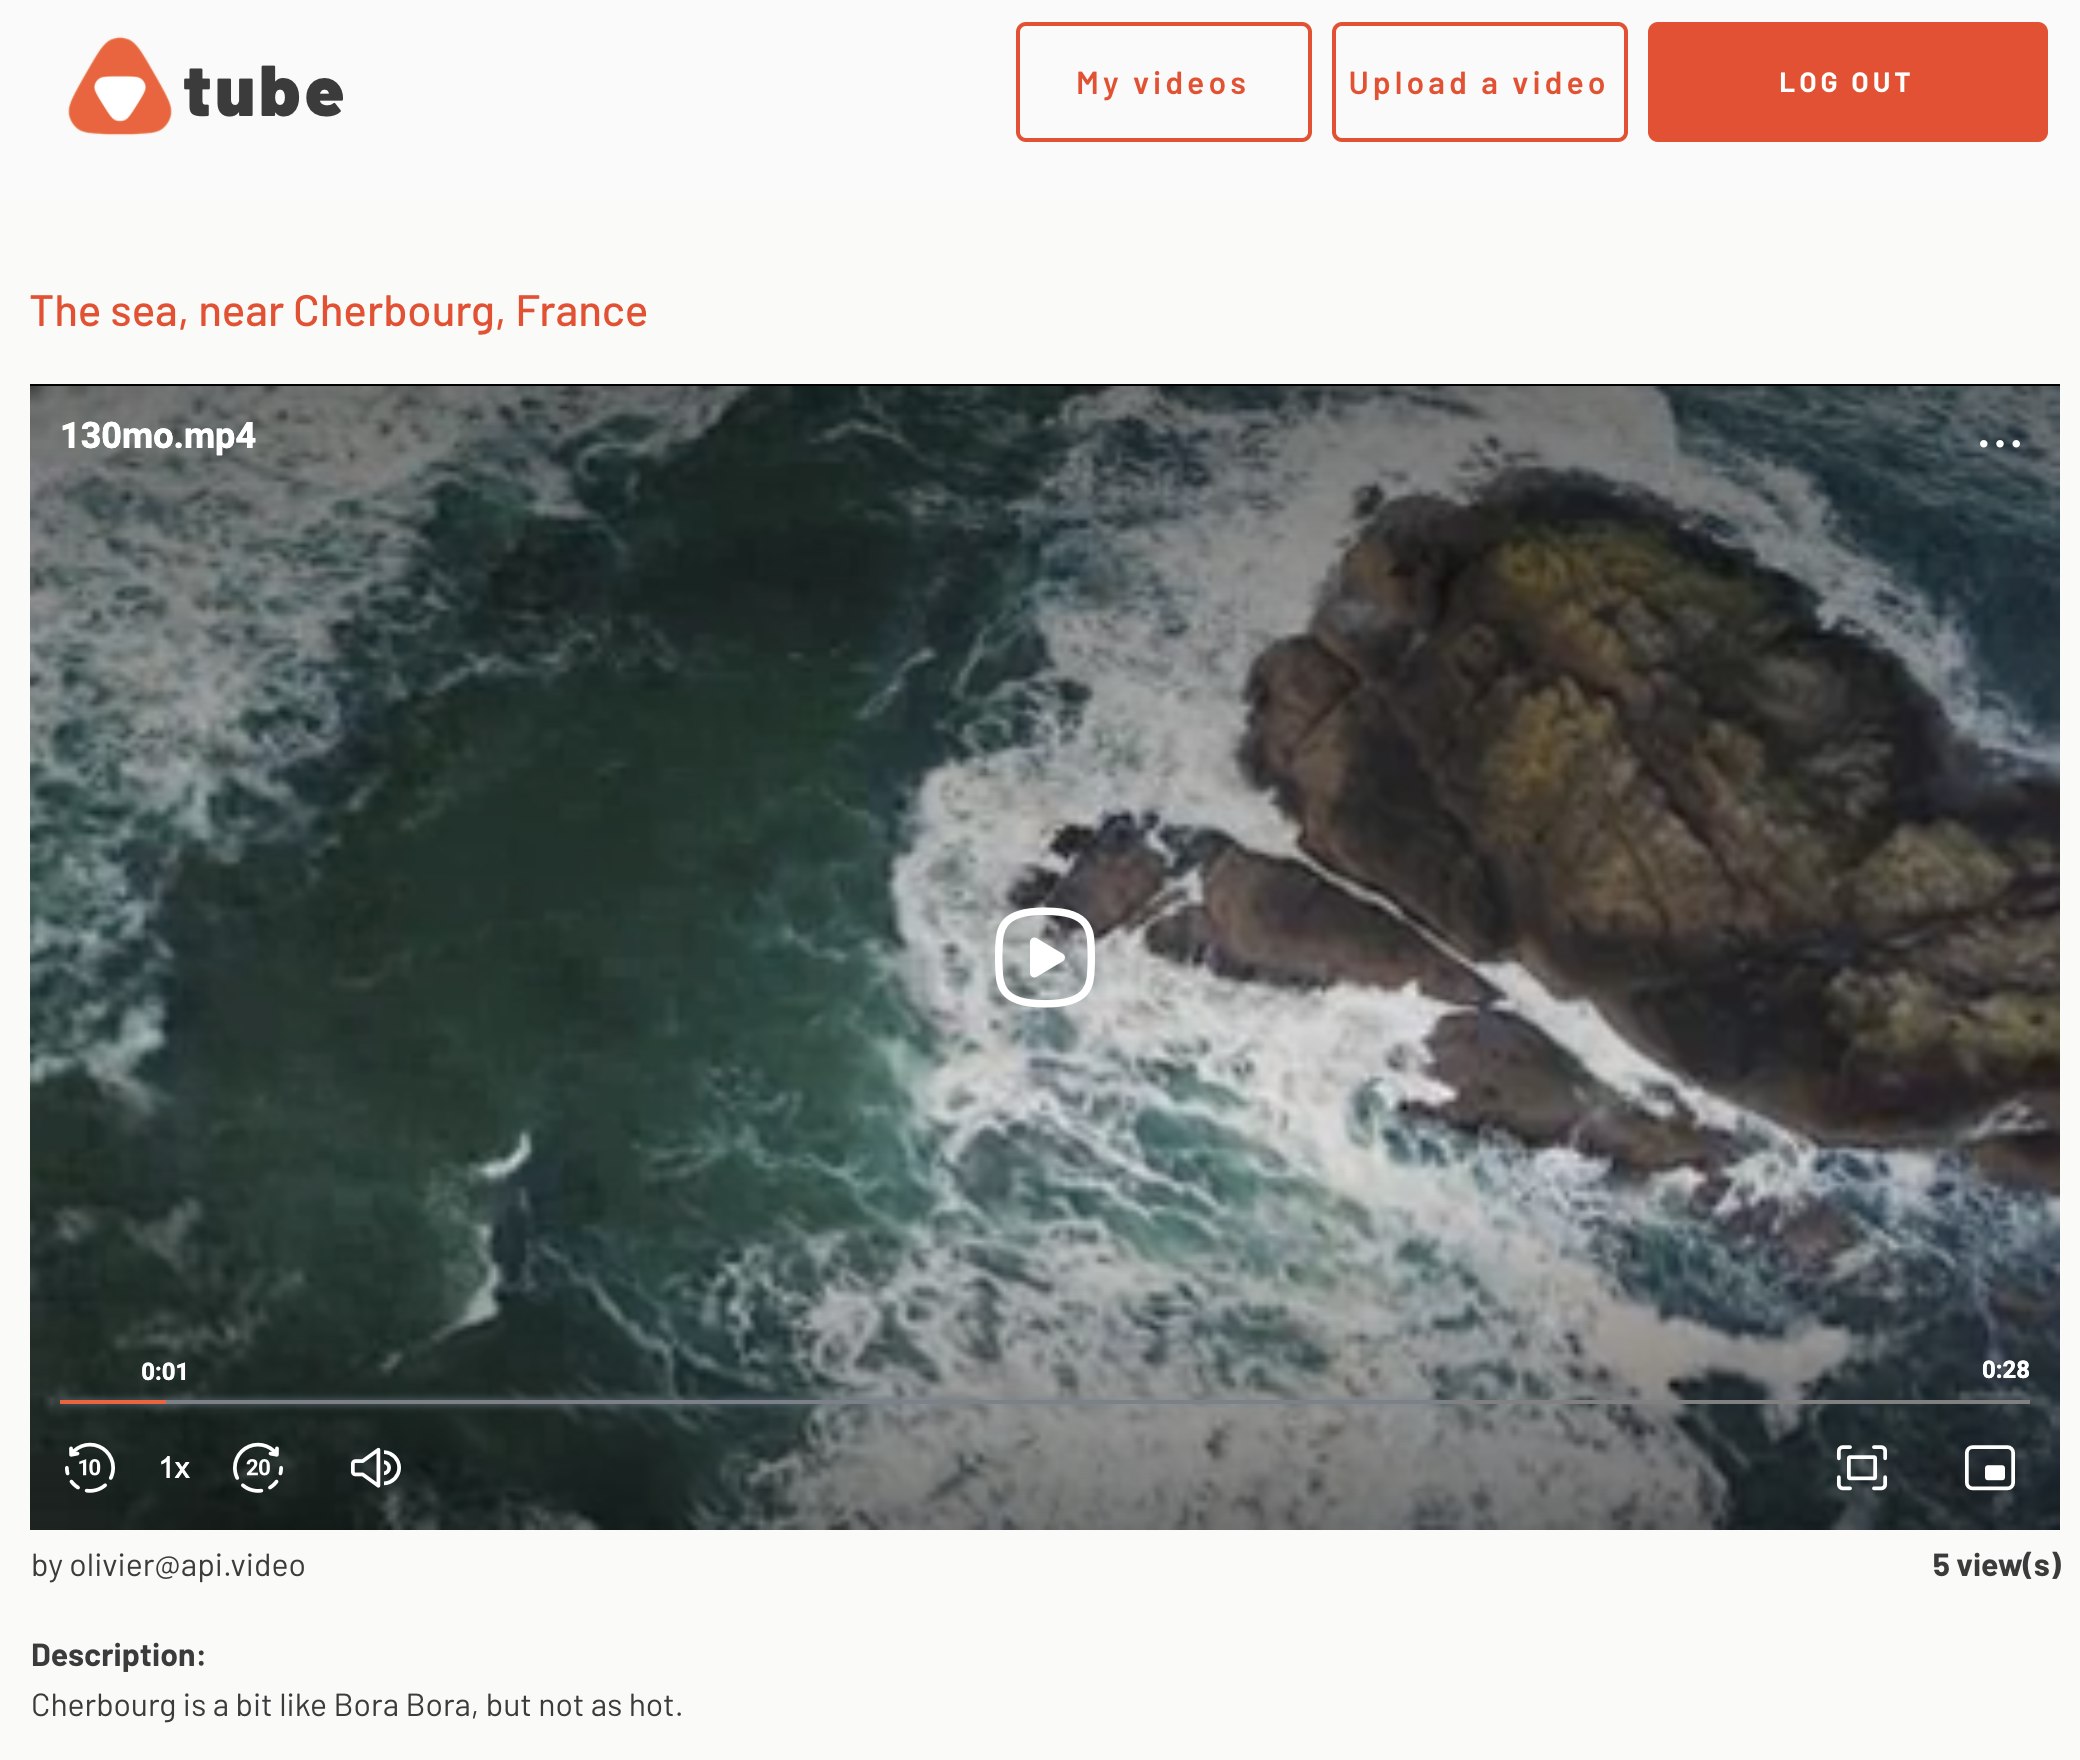
Users land on this page after a click on a video preview from the home page. The page layout consists of a large video player, plus some details about the video:
The same video player element as on the home page is used. The only difference is that when the player element triggers a first play event, a workflow action increments the views value of the video in the database.
Account page
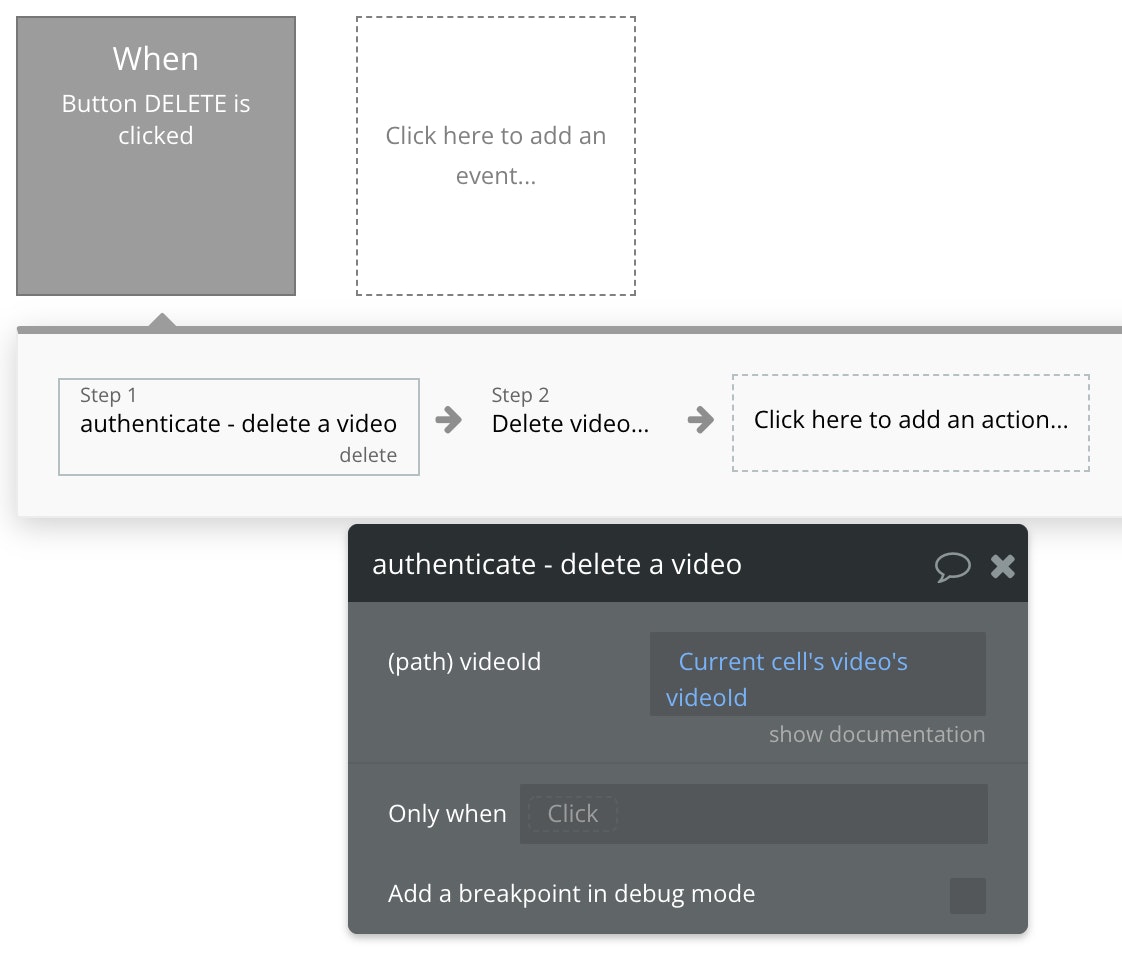
The Account page has almost the same layout as the home page. It consists of a repeating groups iterating on videos. The main difference here is that the videos are filtered in order to only display the ones that have been uploaded by the current user. The other difference is that a "Delete" button is present next to each video. When clicked, the delete endpoint of the api.video API is called, and the video entry is deleted from the database:
Conclusion
In this step by step tutorial we have covered the process of building a video sharing application. In particular, we have looked at the following features of the api.video Bubble plugin:
- the video uploader element
- the video player element
- the API calls
As always, we encourage you to join our Community Forum and sign up to our newsletter (you will find the link below this post).
Olivier Lando
Head of Ecosystem
Follow our latest news by subscribing to our newsletter
Create your free account
Start building with video now


