How to add watermarks to your videos
January 20, 2022 - Erikka Innes in Video watermarking, Python
One of our most requested features is video watermarking. A video watermark is a visible overlay on a video that can be text, a logo, or other image type.
Usually, a watermark serves some purpose like increasing brand awareness by displaying your company logo, or it might prevent someone from claiming a video is their work. Sometimes a watermark might prevent you from putting the content into production - for example at api.video we watermark our sandbox videos since sandbox video content is intended for proof-of-concept testing. A watermark might also present details about privileges you have regarding the video content.
Whatever your reason for watermarking, you can now use api.video to add watermarks to your account, then add them to your video content when you create a new video for the first time or you want to update an existing video. We'll walk through the different options in this tutorial.
Pre-requisites
For this tutorial, you will need:
- api.video account - Sign up here
- api.video Python client - Python client
- An image to use as a watermark, png or jpg
- The video ID for a video you've already uploaded
Installation
Install api.video's Python client with pip install api.video
Code sample
The code sample we're using is this:
import apivideo
from apivideo.apis import WatermarksApi
from apivideo.apis import VideosApi
from apivideo.model.video import Video
from pprint import pprint

client = apivideo.AuthenticatedApiClient("your API key here")

client.connect()

watermarks_api = WatermarksApi(client)

file = open('logo_orange.png', 'rb') # file_type | The .jpg or .png image to be added as a watermark.

api_response = watermarks_api.upload(file)
pprint(api_response)
pprint(api_response['watermark_id'])

watermark_id = api_response['watermark_id']

videos_api = VideosApi(client)

video_creation_payload = {
    "title":"Sample video",
    "description": "Show a watermarked video",
    "watermark": {
        "id": watermark_id,
        "top":"20px",
        "left":"20px",
        "opacity":"70%",
    },
}
api_response = videos_api.create(video_creation_payload)
video_id = api_response["video_id"]

file = open("test_vid45.mp4", "rb")

video_response = videos_api.upload(video_id, file)
print("Uploaded Video", video_response)
Code walkthrough
What you'll be doing in the code is creating a watermark, then retrieving the watermark ID and referencing it when you upload a video that you want to display your watermark on.
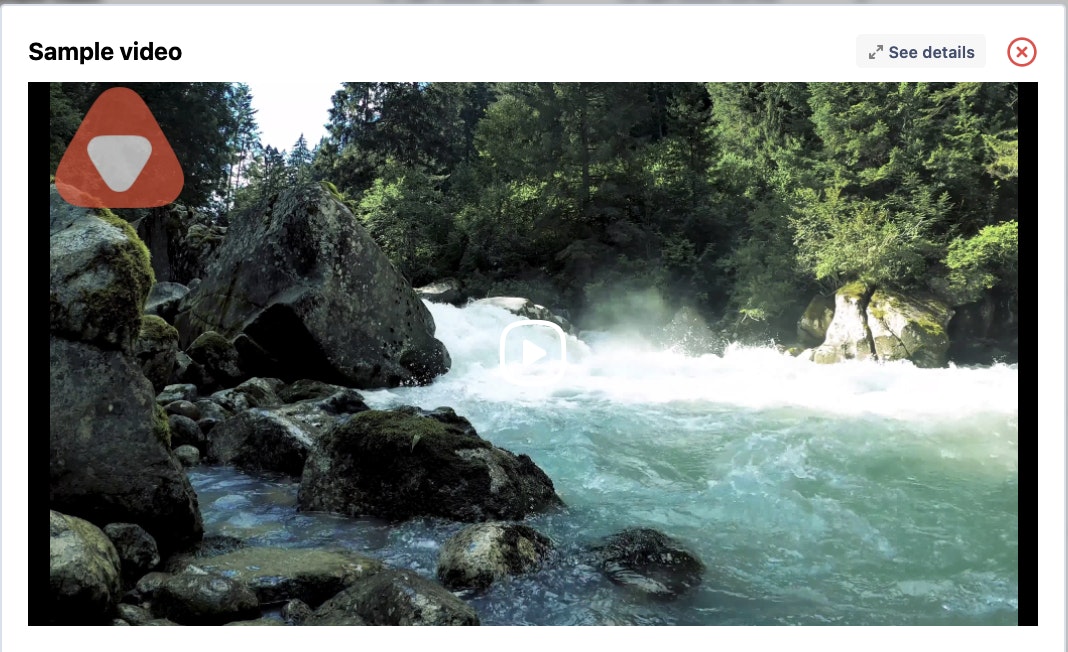
At the end, your watermarked video will be something like this:
NOTE: During the walk through, we'll go over how to move the watermark around the video and resize it. Please be aware that you must upload a new video with your new dimensions each time.
- The first thing to do is initialize the client and connect.
`client = apivideo.AuthenticatedApiClient("your API key here")
client.connect() `
- Next, we prepare our watermark (in this case I've selected the api.video logo and placed my image in the same folder as my code sample) for upload:
`watermarks_api = WatermarksApi(client)
file = open('logo_orange.png', 'rb') # file_type | The .jpg or .png image to be added as a watermark.`
We send the file to api.video:
api_response = watermarks_api.upload(file)We check that our file was successfully sent and retrieve the watermark ID which we'll need if we want to add it to a video.
pprint(api_response)
pprint(api_response['watermark_id'])
- Now we need to create a video container to upload a video into. If you've checked out our other tutorials, you know that video upload is a two part step. You create your container with metadata, then you upload your video into the container. We'll start by preparing to use the video endpoint and setting up our video payload with our watermarking information:
`videos_api = VideosApi(client)
video_creation_payload = { "title":"Sample video", "description": "Show a watermarked video", "watermark": { "id": watermark_id, "top":"20px", "left":"20px", "opacity":"70%", }, }`
- Send the video data in to api.video to create a container to upload your video into, then retrieve the video ID:
api_response = videos_api.create(video_creation_payload)
video_id = api_response["video_id"]
- Now with our video ID we can upload a video:
`file = open("test_vid45.mp4", "rb")
video_response = videos_api.upload(video_id, file) print("Uploaded Video", video_response)`
For the last part, you'll have to wait a little bit while your video processes. Once it's done processing you can see your newly watermarked video!
Retrieve watermarks
If you need to retrieve a watermark ID you can always list all your watermarks. The code for that is this:
import apivideo
from apivideo.apis import WatermarksApi
from apivideo.apis import VideosApi
from apivideo.model.video import Video
from apivideo.model.bad_request import BadRequest
from pprint import pprint

client = apivideo.AuthenticatedApiClient("ifLNxJlfPaVjcTQySAghVqEXEMaGHxX8UrqetFOtBg6")

client.connect()

watermarks_api = WatermarksApi(client)

api_response = watermarks_api.list(sort_by="createdAt")
print(api_response)
Conclusion
Watermarking is a great way to show branding on your video. You can play with the settings to move your watermark around your video or set it to different levels of opacity. You can find the information in our docs or ask questions in our Community. Happy coding!
Erikka Innes
Developer Evangelist
Follow our latest news by subscribing to our newsletter
Create your free account
Start building with video now


