Build a Loom-like app with just a few lines of code
June 30, 2022 - Olivier Lando in Video upload, SDKs and libraries, JavaScript
In this tutorial, we'll see how to build a Loom-like web application using the JS library we've just released: @api.video/media-stream-composer.
Presentation
The Loom tool
For those who do not know the Loom tool, here is the description that can be found on their site:
Loom is a video messaging tool that helps you get your message across through instantly shareable videos.
With Loom, you can record your camera, microphone, and desktop simultaneously. Your video is then instantly available to share through Loom's patented technology.
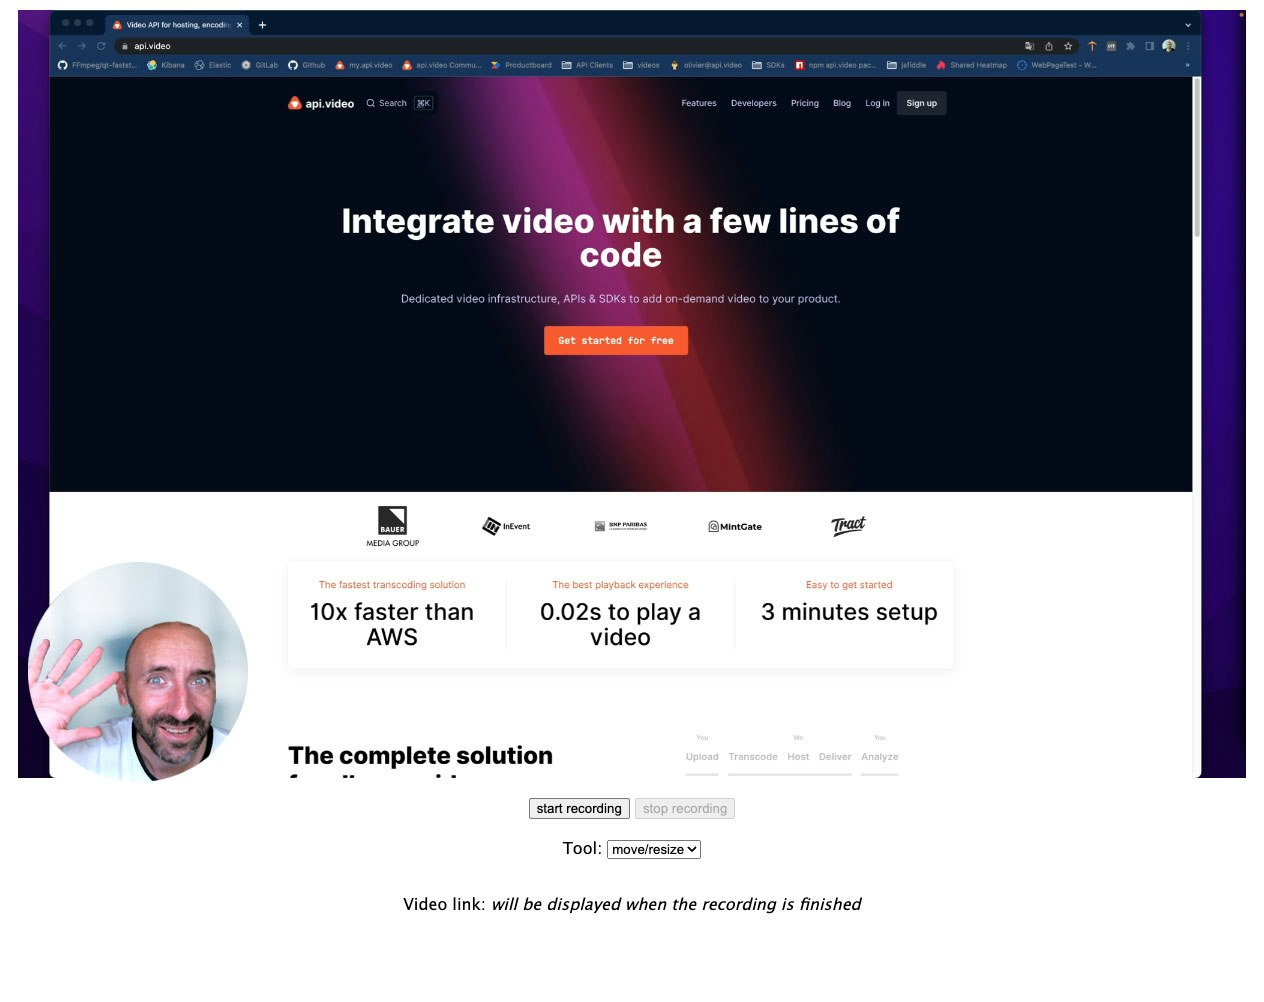
Here we will create a simplified version of Loom, which will incorporate its main functionality, namely uploading videos from a screencast with the user's webcam overlaid as a rounded thumbnail.
The @api.video/media-stream-composer JS library
The @api.video/media-stream-composer aims to simplify handling video streams in browsers.
Here are its main features:
- generated a video stream composed of several video streams available in browsers (webcams, screen recording)
- easily generate & upload this video stream to api.video using api.video's progressive upload feature
- let the user interact with the stream composition on the fly (by moving/resizing each base stream or drawing in the result stream)
The library can be easily included in any web page or added as a dependency to a project, for example, in a React.js application. For more information, feel free to check out the readme on GitHub.
What it will look like
What we will build will take the form of a simple web page where the user will have to choose the screen window he wants to save.
Then this window will be displayed on the web page with the webcam in superposition. It will be possible to move and resize the webcam view.
A button will allow you to start and stop the recording. Once the recording is finished, a link to the uploaded video will be displayed.
The loom-like application in action
Prerequisites
The only things you’ll need are:
- a text editor
- an api.video account - you can easily create a free sandbox account by going here: https://dashboard.api.video/register.
Let’s do it!
Page layout
The first step will be to write the HTML code of the web page. It will be very straightforward since it will contain only the following elements:
- a div container that will contain the preview of the recording
- 2 buttons to start and stop the recording
- a select input to choose the mouse tool: move/resize or drawing
- a text holder for the video link
This is what it looks like:
<html>
    <head>
        <script src="https://unpkg.com/@api.video/media-stream-composer"></script>
        <style>
            body {
                font-family: 'Lucida Sans', 'Lucida Sans Regular', 'Lucida Grande', 'Lucida Sans Unicode', Geneva, Verdana, sans-serif;
            }
            #container {
                display: flex;
                flex-direction: column;
                align-items: center;
            }

            #video {
                border: 1px solid gray;
            }

            #container div {
                margin: 10px 0;
            }
        </style>
    </head>

    <body>
        <div id="container">
            <div id="canvas-container"></div><!-- that will contain the preview --><div>
                <button id="start">start recording</button>
                <button id="stop" disabled>stop recording</button>
            </div>
            <div>
                <label for="tool-select">Tool:</label>
                <select id="tool-select">
                    <option value="draw">draw</option>
                    <option selected value="move-resize">move/resize</option>
                </select>
            </div>
            <div>
<!-- the content of the following video-link span will be replaced with the video url once the video will be uploader -->
							<p>Video link: <span id="video-link"><i>will be displayed when the recording is finished</i></span></p>
            </div>
        </div>
    </body>
</html>
The @api.video/media-stream-composer library
Initialization
Let's get serious! The first step here is to include the script of the library. To do this, we'll add the following in the <head> tag of the page:
<script src="https://unpkg.com/@api.video/media-stream-composer"></script>Fine, the script is now included; we can now add some JS code to initialize the library. To keep it simple for this tutorial, all the JS code will be directly included in the HTML page.
Let's add the following before the closing </body> tag:
<script>
    const width = 1366;
    const height = 768;

    // we put our code in an async function since we will use the `await` keyword
    (async () => {
        // create the media stream composer instance
        const mediaStreamComposer = new MediaStreamComposer({
            resolution: {
                width,
                height
            }
        });

        // display the canvas in our preview container
        mediaStreamComposer.appendCanvasTo("#canvas-container");
    })();
</script>
In this snippet, we create the MediaStreamComposer instance. The MediaStreamComposer is a class that will allow us to compose a video stream from several video streams available in browsers.
Then, we append the canvas created by the MediaStreamComposer to the #canvas-container div. By doing so, the video stream will be displayed on the web page, and the user will be able to interact with it.
We can add our video streams now that we have initialized our library.
Adding video streams
We will add two streams to our composition:
- a screencast of the user's screen in the background
- a webcam stream in a rounded thumbnail in the bottom left corner
Adding a stream is done with the addStream() method. It takes 2 parameters: the MediaStream, and the settings object specifying how the stream should be displayed.
First, we have to request the browser to give us the streams. This is done with the navigator.mediaDevices.getUserMedia() & navigator.mediaDevices.getDisplayMedia() methods.
 (async () => {
    const screencast = await navigator.mediaDevices.getDisplayMedia(); // retrieve the screencast stream
   const webcam = await navigator.mediaDevices.getUserMedia({ // retrieve the webcam stream
        audio: true,
        video: true
   });
   // ...
Now that we have the streams, we can add them to the composer.
     // ...

     // ... MediaStreamComposer instantiation ...

     // add the screencast stream
    mediaStreamComposer.addStream(screencast, {
         position: "contain", // we want the screencast to be displayed in the center of the canvas and to occupy as much space as possible
          mute: true, // we don't want to hear the screencast stream
    });

     // add the webcam stream in the lower left corner, with a circle mask
    mediaStreamComposer.addStream(webcam, {
        position: "fixed", // we want the webcam to be displayed in a specific position on the canvas
        mute: false, // we want to hear the webcam stream
        y: height - 200, // we want the webcam to be displayed in the lower part of the canvas
        left: 0, // we want the webcam to be displayed in the left corner of the canvas
        height: 200, // we want the webcam to be displayed in a 200px height
        mask: "circle", // we want the webcam to be displayed with a circle mask
        draggable: true, // we want the webcam to be draggable by the user
        resizable: true, // we want the webcam to be resizable by the user
    });
})();
Done! The streams are now added to the composer, and the video stream is displayed on the web page. We can now configure the drawing tool.
Drawing tool
The drawing tool is a simple pen that will allow the user to draw on the video stream. It can be configured using the setDrawingSettings() method as follow:
// ...

// ... MediaStreamComposer instantiation ...

// ... streams added ...

// set the drawing settings
mediaStreamComposer.setDrawingSettings({
    color: "#FF0000", // we want the drawing to be red
    lineWidth: 5, // we want the drawing to be 5px wide
    autoEraseDelay: 3, // we want the drawing to be automatically erased after 3 seconds
});
Nice! We're almost done. The last step is to add some buttons & inputs to the web page so the user can interact with it.
User interactions
To simplify the task, we will first create constants containing references to the buttons & inputs.
const startButton = document.getElementById("start");
const stopButton = document.getElementById("stop");
const toolSelect = document.getElementById("tool-select");
const videoLink = document.getElementById("video-link");
We can now bind the events to the buttons & inputs.
The start button
When the user clicks on the start button, we can call the MediaStreamComposer to start recording. We will use the startRecording() method. This method takes an uploadToken as a parameter. An upload token is a unique identifier that will be used to upload the video to api.video. You can create a new upload token using the API or directly from the api.video dashboard.
// when the start button is clicked, start the recording
startButton.onclick = () => {
    mediaStreamComposer.startRecording({ // start the recording
        uploadToken: "YOUR_UPLOAD_TOKEN",
    });
    startButton.disabled = true; // disable the start button
    stopButton.disabled = false; // enable the stop button
}
The stop button
When the user clicks on the stop button, we will call the stopRecording() method. This method returns a Promise that will be resolved when the recording is stopped. The Promise's value is an object containing the details about the uploaded video. We will retrieve the video URL from the object and display it in the video-link element.
// when the stop button is clicked, stop the recording and display the video link
stopButton.onclick = () => {
    mediaStreamComposer.stopRecording() // stop the recording ...
        .then(a => videoLink.innerHTML = a.assets.player); // ... and display the video link
    stopButton.disabled = true; // disable the stop button
    startButton.disabled = false; // enable the start button
}
The tool-select select
This select box will allow the user to select the action performed when the user clicks on the video stream. It can be either "drawing" or "moving / resizing a stream". Choosing a tool is done by calling the setMouseTool() method.
toolSelect.onchange = (a) => mediaStreamComposer.setMouseTool(a.target.value);To go further...
The media stream composer library allows you to do many other things, like selecting a different audio source from the video streams, or adding static images to your composition (to display a logo for example). For more information, feel free to check the readme on the github repo.
Conclusion
You have seen how easy and fast it is to create this application using the @api.video/media-stream-composer library.
The full code is available in the repo of the library on GitHub here: examples/screencast-webcam.html.
You can see the demo live at https://record.a.video/screencast-webcam.html.
To see a more complex example, in action, look at https://record.a.video. You'll be able to test almost all the features of the library in action.
Olivier Lando
Head of Ecosystem
Follow our latest news by subscribing to our newsletter
Create your free account
Start building with video now


