Building a video upload demo with Node.js and api.video
February 1, 2022 - Doug Sillars in Video upload, Video Status, NodeJS
Here at api.video, we love making video delivery easy for our customers. We take care of doing all the video transcoding and video streaming so that you can focus on all the other facets of your product. Using our APIs (and our SDKs) is a straightforward and easy way to add video to your service. In this post, we’ll walk through the steps to create a website where you can upload videos.
Note: Use NodeJS in the middle results in a "double upload" - the video is uploaded to the Node server - then to api.video. You can avoid this with a delegated token and our JS library.
You can also check out our API reference documentation here: API Reference documentation
Overall Architecture
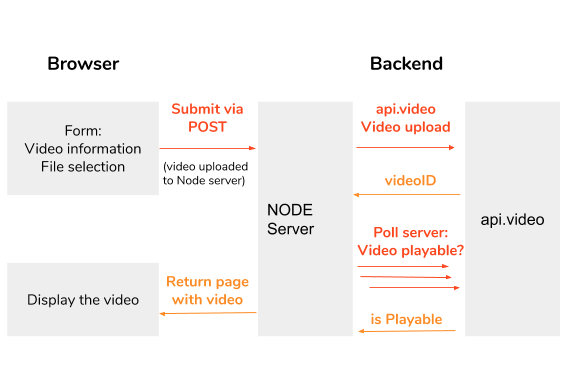
- Starting with a web form, a video is submitted to the Node server.
- The video is immediately uploaded to api.video for processing
- api.video acknowledges the video upload, returns the videoId, and begins encoding the video.
- The node server polls api.video to obtain the playable status (confirming that encoding is completed).
- As long as the result is “false”, the polling continues.
- When the video is playable, the Node server returns a page with the video. The video autoplays to show that the video is ready to play. The page also returns the timings for upload & for video processing.
- The video link is e-mailed to the user (optional).
Getting Started
Node & Dependencies
There are a number of required Node dependencies:
npm install express dotenv @api.video/nodejs-sdk fs pug serve-favicon formidable email-validatorThis tutorial also optionally connects to Intercom to send emails to your users. This will require:
npm install intercom-clientBuilding the Site
Starting index.js
You can clone the GitHub repository to follow along, but here is the code that builds your video uploader:
In the src/index.js file, copy the following code:
import ‘dotenv/config’;
import express from ‘express’;
const app = express();
const pug = require(‘pug’);
app.use(express.json());
app.use(express.urlencoded({ extended: true }));
app.set(‘view engine’,’pug’);
app.use(express.static(‘public/’));
//favicons are the cool little icon in the browser tab
var favicon = require(‘serve-favicon’);
app.use(favicon(‘public/icon.ico’));
app.get(‘/upload-demo’, (req, res) => {
	return res.render(‘start’);
 });
 app.listen(3000, () =>
	console.log(‘Example app listening on port 3000!’),
 );
In this snippet, Node imports Express (and dotenv for environmental variables). The first big chunk of code creates and sets up an express app. It will use Pug to build the views. Static files are saved in the ‘public/’ directory, and serve-favicon adds the favicon to the site. You can use the default favicon in the public directory on GitHub, or create your own.
Next we have app.get — on the default entry point of the site. If a request occurs at the “/upload-demo” directory of the web server, we’ll deliver the start.pug file that is saved in the views directory.
Finally, the app listens on port 3000 for requests. If you run npm start from the terminal, you should get a response of “Example app listening on port 3000!” You can now enter “localhost:3000/upload-demo” into your browser, and if you have added the views directory — you’ll see the form. If you have not yet added the view, you’ll probably get an error.
Start.pug
The landing page is simply an introductory text describing the upload and a form to select the file. This page is created with Pug. Pug is really persnickety about indentation spaces, so it might be best to copy the code (or just use the code) from GitHub rather than copy and paste from this post.
In the head tag, we load some CSS and the favicon.
head
link(rel=’stylesheet’, href=’../style.css’)
link(rel=’icon’, href=’icon.ico’, type=’image/x-icon’)
body
header.header
 h1 Test out api.video
 h2 Upload a video, and have an encoded video stream in no time!
 h2 Add your e-mail address to receive a link to our video without watermark.
 h2 If you do not submit an e-mail address, your video will be watermarked and deleted after 72 hours.

 form(action=”/” method = “POST” enctype=”multipart/form-data”).form
 p
 | Video Name:
 input(type=’text’, name=’title’, value=”video title”).input
p
 | Email Address:
 input(type=’email’, name=’email’).input
 p
 |Save as Mp4?
 input(type=’radio’, name=’mp4', value=’true’, checked)
 | true
 input(type=’radio’, name=’mp4', value=’false’)
 | false
 p
 input(type=’file’, name=’source’).input
 input(type=’hidden’ name=’metadata’ value=’{“videoUpload”:”true”}’)
 p
 p
 input(type=’submit’, value=’Submit’)
The body loads descriptive text on api.video, and the submission form. The form takes 4 inputs: video name, e-mail, true/false mp4 support and the video file. You may notice that the form action will reload the root directory of the server. Since the data submission is a POST, it will be easy to identify the 2nd request.
POST Form Processing
Add these additional lines to the index.js. At the top of the file, we need to add dependencies:
//apivideo
const apiVideo = require(‘@api.video/nodejs-sdk’);
//set up api.video client with my production key
//I keep my key in a .env file to keep it private.
//if you have a .env file, make sure you add it to your .gitignore file
 var client = new apiVideo.Client({ apiKey: process.env.apivideoKeyProd});
//formidable takes the form data and saves the file, and parameterises the fields into JSON
const formidable = require(‘formidable’)
//email-validator to validate the email address
var validator = require(“email-validator”);
 //create timers to measure upload and processing timings
 let startUploadTimer;
let uploadCompleteTimer;
 let playReadyTimer;
api.video is our backend where uploaded videos are transcoded into video streams. We add the SDK, and then I store my API key in a .env file. I have added the .env file to my .gitignore file so that when I post my code on GitHub, my key is not uploaded and remains secure.
We also add formidable to read the form data and save the video locally on the Node server. The e-mail validator does what it sounds like it might do, and finally I add three variables to measure how quickly the service handles the video processing.
In the body of index.js, add the following:
app.post(‘/upload-demo’, (req,res) =>{
//formidable reads the form
 var form = new formidable.IncomingForm()
//use .env feil to set the directory for the video uploads
//since we will be deleting the files after they uplaod to api.video
//make sure this directory is full write and delete
form.uploadDir = process.env.videoDir;
 //TODO form validation (mp4 file type, etc)
form.parse(req, (err, fields, files) => {
if (err) {
 console.error(‘Error’, err);
 throw err;
 }

//testing — writing fields and info on the file to the log
console.log(‘Fields’, fields);
 //console.log(‘Files’, files.source);
//console.log(‘file size’, files.source.size);
//console.log(‘file path’, files.source.path);
 //mp4 support must be boolean — so set to false
//then modify to true if the form has it set to true
let mp4Support = false;
 if (fields.mp4 ==”true”){
 mp4Support = true;
 }
 //if email address is added use prod
 let useProduction = true;
 console.log(‘valid email?’, fields.email, validator.validate(fields.email));
 if(validator.validate(fields.email)){
 //prod
console.log(“using production!”);
 }else{
 //sandbox
 //set up api.video client with my sandbox key
 client = new apiVideo.ClientSandbox({ apiKey: process.env.apivideoKeySandBox});
 console.log(“using sandbox!”);
 useProduction = false;
 }
 //metadata must be converted into an array
 //uploading. Timers are for a TODO measuring upload & parsing time
 startUploadTimer = Date.now();
 console.log(“start upload”, startUploadTimer);
 let result = client.videos.upload(files.source.path, {title: fields.title, mp4Support: mp4Support});
 });
 });
 }).catch(function(error) {
 console.error(error);
 });;

}
We are now building the POST response. Formidable saves the video in the directory specified in the .env variable videoDir (this doesn’t have to be private, but it is nice to save all configurable variables in one place). When the upload requests mp4 support, the variable must be a boolean, so we use the string from the response to create the corresponding boolean value. The email validator validates the email, and if the email is valid - we use production credentials at api.video (permanent video hosting). If there is no e-mail, or it is not valid, the video is instead processed in the Sandbox, meaning that it will be watermarked & deleted after 24 hours. For your use — you probably just want to post to production, so you can simplify this logic.
Finally, we begin the upload of the video to api.video (and capture the time of the upload start).
If you try to run this code now, it will hang — we are not yet listening for the response from api.video. However, adding:
console.log(result);Will show the JSON response from api.video:
{
videoId: ‘vi4Injp5dMt6CNsMMjJ61k8Z’,
title: ‘video title’,
description: ‘video uploaded by:<email address>’,
public: true,
panoramic: false,
mp4Support: true,
tags: \[\],
metadata: \[\],
source: { type: ‘upload’, uri: ‘/videos/vi4Injp5dMt6CNsMMjJ61k8Z/source’ },

assets: { iframe: ‘<iframe src=”https://embed.api.video/vod/vi4Injp5dMt6CNsMMjJ61k8Z" width=”100%” height=”100%” frameborder=”0" scrolling=”no” allowfullscreen=””></iframe>’,
 player: ‘https://embed.api.video/vod/vi4Injp5dMt6CNsMMjJ61k8Z',
hls: ‘https://cdn.api.video/vod/vi4Injp5dMt6CNsMMjJ61k8Z/hls/manifest.m3u8',
thumbnail: ‘https://cdn.api.video/vod/vi4Injp5dMt6CNsMMjJ61k8Z/thumbnail.jpg'
 },

publishedAt: ‘2020–02–23T21:08:09+00:00’
}
The videoID is important to display and playback the video, as are the assets. We also can see useful metadata about the video — Mp4Support, Panoramic, public/private, etc. Note that there is no mp4 url — the video must be encoded to receive that url, so we’ll grab it later.
Video Upload Response
After the “let result = client.videos.upload(files.source.path, {title: fields.title, mp4Support: mp4Support});” paste in the lines below.
We listen for the result from the upload. This allows us to mark upload completed (to measure the elapsed upload time). If the video has successfully been uploaded to api.video, we now have 2 copies of the video: one on the node server, and the other at api.video. Fs.unlink deletes the file on the node server. The JSON response gives us the videoId at api.video, and links to the iframe and player video urls (which we assign to variables). The mp4 url is only presented in this response when encoding is finished.
Even though we have the urls to the videos, they have not been processed yet. To determine if the video is playable, we call the videoStatus function. This sends a request to api.video to obtain the video status. The response is a JSON with lots of details about upload status, file size, and metadata like the dimensions and bitrate (you can learn more about these parameters in the documentation):
{
ingest: IngestStatus {
status: ‘uploaded’,
filesize: 13371095,
receivedBytes: \[\]
 },
 encoding: EncodingStatus {
playable: true,
qualities: \[ \[Object\], \[Object\], \[Object\], \[Object\], \[Object\], \[Object\] \],
metadata: {
width: 1920,
height: 1080,
 bitrate: 4553.93,
duration: 23,
framerate: 30000,
 samplerate: 0,
 videoCodec: ‘h264’,
 audioCodec: ‘’,
 aspectRatio: null
 }
 }
 }
Reading the videoStats.encoding.playable value tells us if it is ready to play or not. If it is not ready, we call videoStatus again recursively until we get the affirmative response. When we receive that ‘playable’ is true (as in the example above), the function can then query for the MP4 url, and return the view to the user: return res.render(‘video’, {iframe, player, uploadSeconds,processSeconds});
This means that video.pug will be displayed to the end user with some variables (the urls of the video, and timings on upload and processing). We’ll discuss that view in the next section.
 //the result is the upload response

 result.then(function(video) {
 uploadCompleteTimer = Date.now();
 console.log(“upload complete”, uploadCompleteTimer);
 //delete file on node server
 fs.unlink(files.source.path, function (err) {
 if (err) throw err;
 // if no error, file has been deleted successfully
 console.log(‘File deleted!’);
 });
 //read information from API.video upload JSON response
 console.log(‘video’, video);
 let videoId = video.videoId;
 console.log(‘videoId’, videoId);
 console.log(‘player’, video.assets.player);
 let iframe = video.assets.iframe;
 let player = video.assets.player;
 let mp4 = video.assets.mp4;
 //check video status until it is published
 //when video is playable resturn the video page
videoStatus(video);
//this means that the video is now playable
//so load video.pug, to display the video to the user.
function videoStatus(video) {
//console.log(video);
let videoId = video.videoId;
 let iframe = video.assets.iframe;
let playable = false;
 let status = client.videos.getStatus(videoId);
 status.then(function(videoStats){
//console.log(‘status’, status);
//we have the video uploaded, now we need to wait for encoding to occur
playable = videoStats.encoding.playable;
console.log(‘video playable?’,videoStats.encoding.playable, playable);
if (playable){
//video is ready to be played
console.log(“ready to play the video”);
playReadyTimer = Date.now();
let uploadSeconds = (uploadCompleteTimer-startUploadTimer)/1000;
let processSeconds = (playReadyTimer — uploadCompleteTimer)/1000;
console.log(“video uploaded in: “, uploadSeconds);
console.log(“video processed in: “, processSeconds);
console.log(iframe);
if(useProduction){
//if user submitted an email — we are in prod — and can email the link to the videos.
intercomIntegration(fields.email,player, mp4,mp4Support,uploadSeconds,processSeconds);
}
return res.render(‘video’, {iframe, player, uploadSeconds,processSeconds});
}else{
 //not ready so check again in 2 seconds.
console.log(“not ready yet” );
 setTimeout(videoStatus(video),2000);
 }
}).catch(function(error) {
console.error(error);
});;
}
Displaying the Video
The Video.pug file is a simple html file that simply adds an iframe for the video, and reports the elapsed times for upload and processing of the video. The variables are ensconced in #{} tags. One other interesting thing to note is adding #autoplay to the url tells the video player to autoplay the video (you can also add #loop to loop the video).
head
 link(rel=’stylesheet’, href=’style.css’)
link(rel=’icon’, href=’icon.ico’, type=’image/x-icon’)
body
 header.header
 h1 Your Video is ready to play!
 div.video
p <iframe src=#{player}#autoplay width=”100%”” height=”100%” frameborder=”0" scrolling=”no” allowfullscreen=””></iframe>
 p Check your e-mail for a link to the video.
 p Video uploaded in #{uploadSeconds}s, and processed in #{processSeconds}s.
 p <a href=”/”>Upload another video</a>.
And there we have it, a working video upload tool, where the response page shows the encoded video, along with the time for upload and for processing! Pretty cool!

Optional Step: Email integration
In the video upload response section, there is a line of code that calls the intercom integration:
intercomIntegration(fields.email,player, mp4,mp4Support,uploadSeconds,processSeconds);

The function for the integration reads as:

function intercomIntegration(email,player, mp4,mp4Support,upload,process){

//while the video is processing, upload the email to intercom

//there is a valid email address, let’s write it to Indercom

// Create a contact with attributes

intercomClient.leads.create({ email: email, tags: “upload demo”}, function (r) {

var intercomId=””;

console.log(“user creation:”, r.body);

if(r.body.errors){

//user already exists

//get the ID

var errorString = r.body.errors\[0\].message;

console.log(“errorstring”,errorString);

var idStart = errorString.lastIndexOf(“=”) +1;

intercomId =errorString.substring(idStart);

console.log(“retrived id”,intercomId);

}else {

//user created

intercomId = r.body.id;

console.log(“user creation:”, r.body);

}

//add upload demo tag

intercomClient.tags.tag({ name: ‘upload demo’, users: \[{ id: intercomId }\] }, function (tag){

console.log(“tag addition”, tag.body);

});

//send an email with the video links

var emailbody = “”;

if (mp4Support) {

emailbody = “Hi “ +email+”,\\n Thank you for using our upload demo. Your video was uploaded in “+upload+” seconds, and processed in “+process+” seconds. You can see your video here: “

+player+”. You can view the mp4 at “ + mp4 +”. Come learn more at <a href\\”https://api.video\\"api.video</a>”

+”\\n Thanks, \\n the api.video team”;

}else{

emailbody = “Hi “ +email+”,\\n Thank you for using our upload demo. Your video was uploaded in “+upload+” seconds, and processed in “+process+” seconds. You can see your video here: “

+player+”. Come learn more at <a href\\”https://api.video\\"api.video</a>”

+”\\n Thanks, \\n the api.video team”;

}

console.log(“emailbody”, emailbody);

console.log(“intercom admin:”, intercomAdmin);

var message = {

message\_type: “email”,

subject: “Thank you for using the api.video upload demo”,

body: emailbody,

template: “plain”,

from: {

type: “admin”,

id: intercomAdmin

},

to: {

type: “user”,

id: intercomId

}

}

intercomClient.messages.create(message, function(email){

console.log(“email: “, email.body);

});

});

}
We first create a lead (or a contact) inside Intercom. This will come back with an id that uniquely IDs the user. If the email address already exists, Intercom returns an error message that says “There is already a user with the id=
Then we can add a tag to Intercom to show that the user has used the video upload tool, and we send an email to the user’s email address with links to the videos, and the time it took to upload and process the videos. The text of the email is right in the code, so easy to modify.
Update (2022)
We have a new version of a video uploader that uses a delegated token. It is live at upload.a.video, and you can read a post on delegated token upload. Delegated tokens remove the "double upload" to Node and then to api.video: videos are directly uploaded to api.video.
Conclusion
We’ve built a video uploader using Node.js and api.video. The easy to build tool now gives us the ability to easily share our videos across our internet properties. Using Node and api.video, the entire process creates an easy to use interface to take regular videos, and convert them into video streams. If this tutorial has inspired you (or if you have any questions), let us know by posting in our community forum.

Doug Sillars
Head of Developer Relations
You may also like
in Android, Video upload, Kotlin

in Video upload, Android, Kotlin

in Player SDK, video create, Video list, Video upload, Player, Mobile, React, Typescript, Next.js


Follow our latest news by subscribing to our newsletter
Create your free account
Start building with video now