Upload a video with Laravel
October 13, 2021 - Erikka Innes in video create, Video upload, PHP
The first step to displaying your video online is getting it uploaded. Today we'll go over how to upload a video using Laravel 8 with api.video's PHP Client. Before we dive in, let's go over what we'll be doing when we upload a video.
Uploading a video is a two step process. First, we create a container for the video and retrieve the video ID. Then, we upload a video into the container by referencing the ID. You can only upload a video to a container once, but you can modify details about the video at any time after that. Our uploader will let you add a title, description and list whether you want to have the video be public or private and whether you want to offer an MP4 link of the video for download.
What you'll need
To get started, make sure you have these things:
- Account with api.video - you can sign up here
- Laravel 8 - you can use other versions, but some things work differently
- NPM and node.js - you install these when you set up Laravel
- Composer - you'll need this installed
- Project repository - https://github.com/apivideo/php-api-client/tree/main/examples/laravel/video_upload
You can also review the API reference documentation for the endpoints used in this project:
Create your project
The first thing you'll need is a Laravel 8 project to work with. Here's what I did:
- In a terminal make a new project by typing: laravel new fileuploader or similar project name.
- Open your project folder, you'll need to install a few things.
- You'll need to add the api.video PHP client, so at the terminal type: composer require api-video/php-api-client
- You'll also need the symfony http client, at the terminal type: composer require symfony/http-client
- And the last thing to add is nyholm/psr7: composer require nyholm/psr7
You can type composer update to make sure everything is pulled in to your project and configured.
Create a controller
We will need a controller for our video uploader, so let's go ahead and do that now. In the terminal in your project folder type:
php artisan make:controller UploadController
This will automatically create what we need to start building the controller.
Set up the home page with an upload form
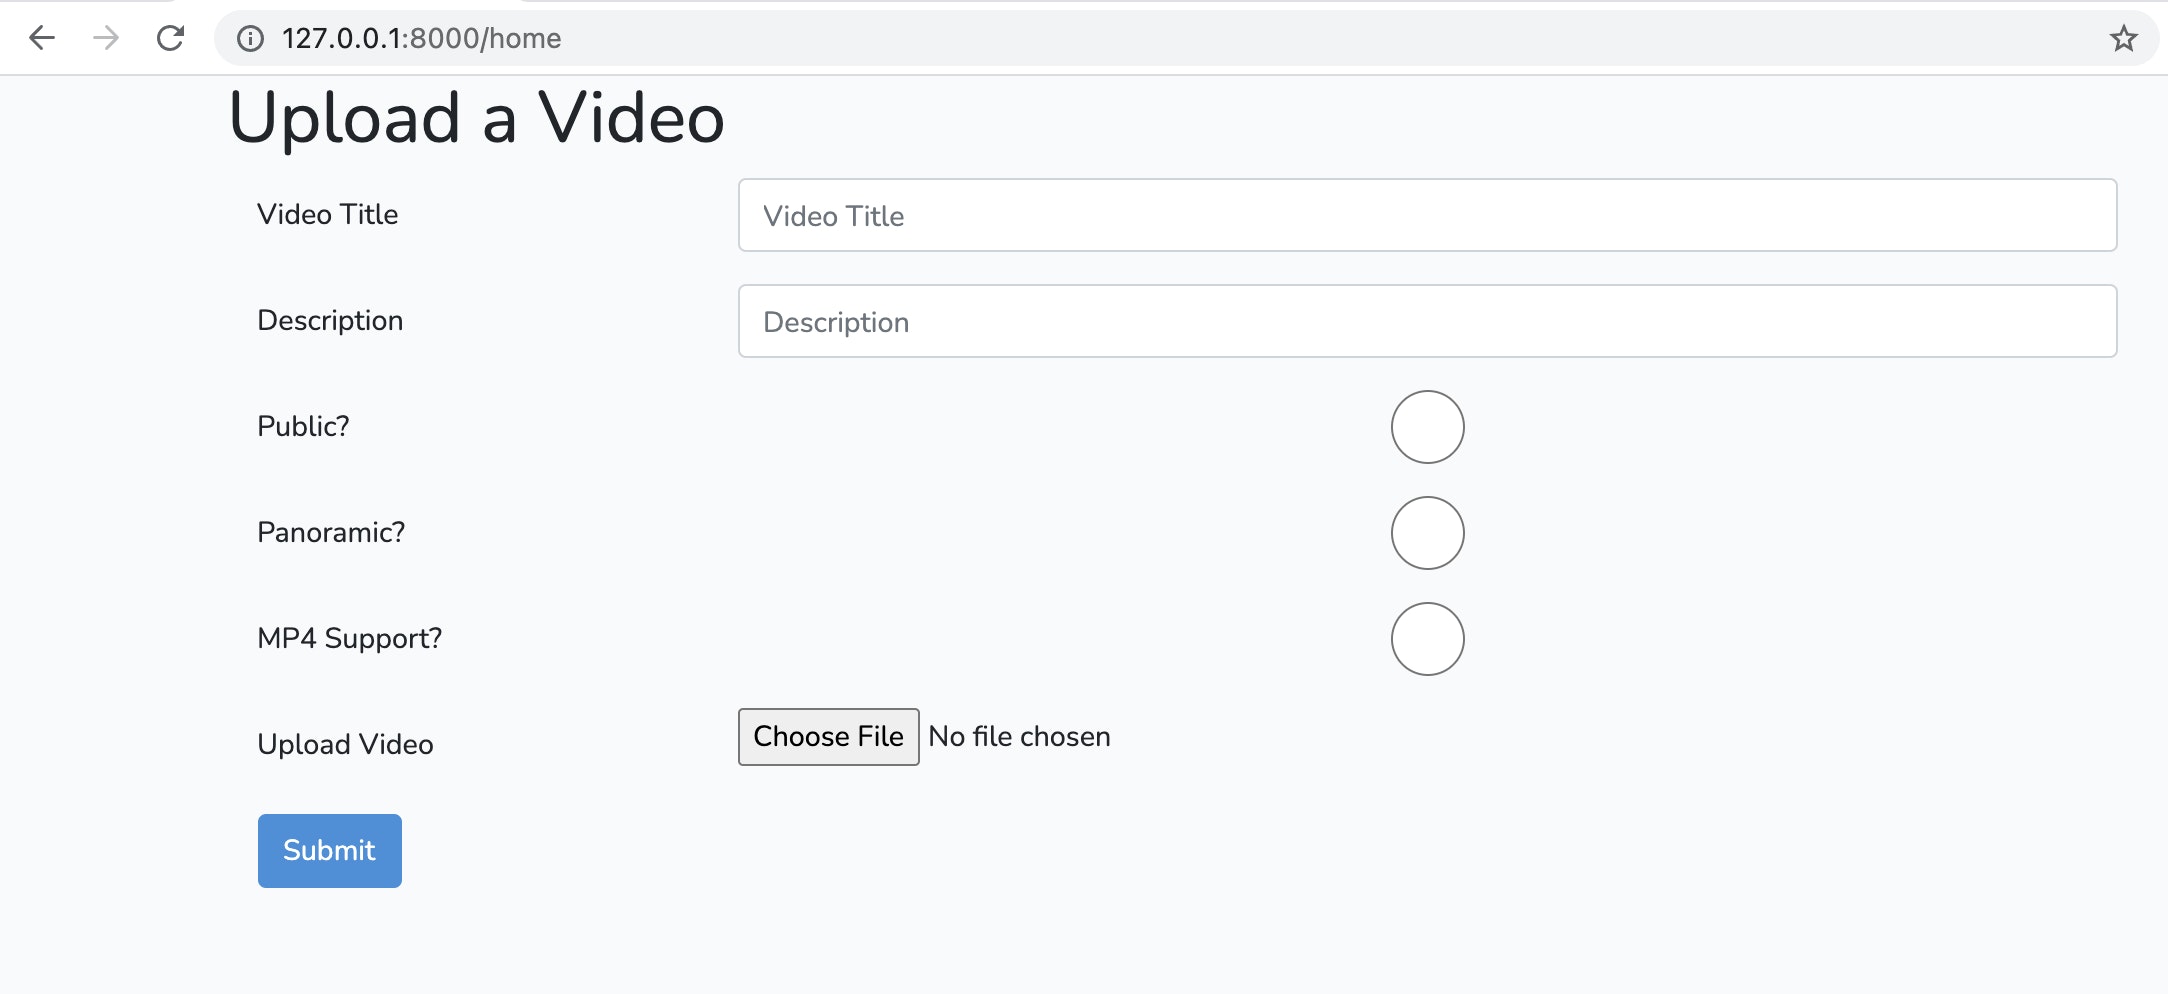
For this walkthrough, we're using the home page to create an upload form. So in your views folder, go into home.blade.php and create the form. I selected to allow the user to add basic details about their project. I'm also using bootstrap, so the basic form looks like this:
And here is the code that creates this form:
<!DOCTYPE html>
<html lang="{{ str_replace('_', '-', app()->getLocale()) }}">

<head>
    <title>Upload a Video</title>
    <!-- Scripts -->
    <script src="{{ asset('js/app.js') }}" defer></script>

    <!-- Styles -->
    <link href="{{ asset('css/app.css') }}" rel="stylesheet">
</head>
<body>
    <div class="container">
        <form action="/upload" enctype="multipart/form-data" method="post">
            @csrf
            <div class="row">
                <h1>Upload a Video</h1>
            </div>
            <div class="form-group row">
                <label for="title" class="col-sm-3 col-form-label">Video Title</label>
                <div class="col-sm-9">
                    <input name="title" type="text" class="form-control" id="title" placeholder="Video Title">
                </div>
            </div>
            <div class="form-group row">
                <label for="description" class="col-sm-3 col-form-label">Description</label>
                <div class="col-sm-9">
                    <input name="description" type="text" class="form-control" id="description" placeholder="Description">
                </div>
            </div>
            <div class="form-group row">
                <label for="public" class="col-sm-3 col-form-label">Public? (Click for No)</label>
                <div class="col-sm-9">
                    <input name="public" type="radio" class="form-control" id="public" placeholder="Public">
                </div>
            </div>
            <div class="form-group row">
                <label for="mp4support" class="col-sm-3 col-form-label">MP4 Support? (Click for No)</label>
                <div class="col-sm-9">
                    <input name="mp4support" type="radio" class="form-control" id="mp4support" placeholder="MP4 Support?">
                </div>
            </div>
            <div class="form-group row">
                <label for="video" class="col-sm-3 col-form-label">Upload Video</label>
                <div class="col-sm-9">
                    <input name="video" type="file" id="video">
                </div>
            </div>
            <button type="submit" class="btn btn-primary">Submit</button>
        </form>
    </div>

</body>
</html>
We pull in the bootstrap details up top under the Scripts and Styles sections. Then for our form, we have all the form data sent in a POST request to the '/upload' route. (We'll need to create that route in a moment.)
The form is straightforward - we list the type of data as text for the name of the file and the description of the file. For choosing whether the file will be public or offer an MP4 for download, we use a radio button, so the type is radio. For the video, we choose type file and then we set up our submit button. Bootstrap styles everything for us, so we're all set here. Now we need to handle the route.
Set up the /upload route
Open your web.php file and add a new route:
Route::post('/upload', 'UploadController@upload');
This route indicates that when submit is clicked in the form, it should go to /upload and carry out the upload instructions listed for the UploadController.
We don't have that set up yet, so let's do that next. Also, the other routes are added into the project, you can see everything if you download the repository.
Set up your UploadController
Our controller takes the details provided by the form, then uploads the content to api.video. Behind the scenes, we're going to need our api.video API key, so let's make sure we handle it securely.
- Go to your .env file. In the top section, you'll see items to do with your app. At the bottom of the list of items beginning APP_ you'll see APP_APIVIDEO=yourapikey. Replace yourapikey with your key (retrieve it from your api.video dashboard). Don't add quotes.
- Open RouteServiceProvider.php.
- In the file, take the commenting \ off of the line protected $namespace = 'App\Http\Controllers';. This returns the use of the automatic namespace, which is handy.
- Open UploadController.php.
- Add this code:
<?php

namespace App\Http\Controllers;

use ApiVideo\Client\Client;
use ApiVideo\Client\Model\VideoCreationPayload;
use Illuminate\Http\Request;
use Symfony\Component\HttpClient\Psr18Client;

class UploadController extends Controller
{
    public function upload()
    {
        $httpClient = new Psr18Client();
        $client = new Client(
            'https://ws.api.video',
             env('APP_APIVIDEO'),
            $httpClient
        );
        $file = request()->file('video');
        $fileName = request()->title;
        $payload = (new VideoCreationPayload())->setTitle($fileName);
        $payload = $payload->setTitle('Hello');
        if (isset(request()->description))
        {
            $payload->setDescription(request()->description);
        }
        if(isset(request()->public))
        {
            $payload->setPublic(False);
        }
        if(isset(request()->mp4support))
        {
            $payload->setMp4support(False);
        }
        $video = $client->videos()->create($payload);
        $filePath = request()->file('video')->getRealPath();

        $response = $client->videos()->upload(
            $video->getVideoId(),
            new \SplFileObject($filePath)
        );

        return redirect('/response');
    }
}
In our code, we set up the api.video client and collect the information from the request object that comes in from the form. We check if the data for the radio buttons is set and if it is, we add it to our payload for upload. Then we send the data and redirect the user to a page that says 'Success!'
Conclusion
These are the basics for uploading a video to api.video. You can try using different styles or set ups if you want to allow users to add more metadata on upload. If you have any questions or suggestions, please share them on our community forum. Thanks for reading!
Erikka Innes
Developer Evangelist
Follow our latest news by subscribing to our newsletter
Create your free account
Start building with video now


