There’s no doubt that Next.js is a leading solution for creating a full-stack web application. Some of the biggest and finest companies around the world are using this React framework such as Twitch, Nike, and Notion.
On October 2022, Vercel released one of its biggest updates in a brand new version: Next.js 13. This new release ships React 18 with it and some big new features.
Read the full Next.js 13 / React 18 release notes to learn more.
Let’s see how we can manage videos in a Next.js 13 and React 18 web application with api.video 🧘🏽♂️
Create a Next.js 13 application 🚀
If you already have a Next.js project with a version under 13, you can upgrade it to v13 by following this guide. To keep this article simple, we will create a new application.
- Run one of the following commands in a new terminal and follow the command prompts
npx create-next-app@latest
# or
yarn create next-app
# or
pnpm create next-app
We will name our brand new application videos_app. We will use TypeScript, ESLint (not mandatory), the src/ directory, and the app/ directory (since there is a new V13 feature available). Don’t configure any alias yet.
- Open your app and run it 🏃🏽
npm run dev
# or
yarn dev
# or
pnpm dev- Check it out on
http://localhost:3000and editsrc/app/page.tsxto see the updated result in your browser. Next.js 13 introduces theapp/directory that can be used pretty much as thepages/directory. More information available on their documentation.
Everything is working fine? Good job! 🎉
💡 Too long for you? Create a video-ready Next.js app with all api.video tools already installed in seconds with our official Next.js boilerplate! Read our short tutorial here 🤓
Our video application structure 🏗️
Our goal here is to build a basic but fully operational video application. To do so, we will divide it into 3 pages:
- Our landing page to upload a video ⬆️
- A player view where you can playback a video 📺
- A videos list view where all of your videos will be displayed 🏄🏽♂️
Next.js provides a perfect navigation and page system that will help us build our project easily.
Get your API key 🔑
To be able to upload and playback videos from api.video, create and customize video players, and do many more things, you need an API key. Get it from your dashboard or create a free account (yes, it’s free, really).
A minimal layout first 💅🏽
The goal of this tutorial is to make a working video app without any great design. But we need a minimal layout: top navigation, and a little CSS to keep things readable. We will also create a loading component that is automatically displayed while the content of a route segment loads 😲
- Replace your
src/app/layout.tsxcode with the following one.
'use client'

import Link from 'next/link'
import { useRouter } from 'next/navigation'
import './globals.css'

export default function RootLayout({
  children,
}: {
  children: React.ReactNode
}) {
  const router = useRouter()
  return (
    <html lang="en">
      {/*
        <head /> will contain the components returned by the nearest parent
        head.tsx. Find out more at https://beta.nextjs.org/docs/api-reference/file-conventions/head
      */}
      <head />
      <body style={{display: 'flex', flexDirection: 'column', alignItems: 'center', padding: 60}}>
        <header style={{display: 'flex', gap: 15, alignSelf: 'flex-start', marginBottom: 30}}>
          <Link href="/">Upload a video</Link>
					{/* We use the router here to revalidate our videos data on each page load */}
          <div style={{ cursor: 'pointer' }} onClick={() => router.push('/videos')}>Videos list</div>
        </header>
        {children}
      </body>
    </html>
  )
}
Next.js 13 app directory allows you to declare layout globally (root layout) and for specific pages (nested layouts). The src/app/layout.tsx file also replaces the previous pages/_app.js and pages/_document.js. Read more about it here.
- Create a new file
src/app/loading.tsxand add a simple component.
export default function Loading() {
  return <p>Loading...</p>
}
In Next.js 13, a loading.[tsx,js] file in the app directory is globally and automatically used by your whole application for loading state. How great it is! Read more about it here.
Upload a video with Next.js 13 ⬆️
In this section, we will create a page that allows a user to select a video file and upload it to api.video.
We will keep this view as our home page, the src/app/page.tsx file.
- We need to use the api.video TypeScript video uploader package to upload a video to your project. Install it by running one of the following commands
npm i @api.video/video-uploader
# or
yarn add @api.video/video-uploader
# or
pnpm i @api.video/video-uploader- Edit src/app/page.tsx as follows
'use client'

import { ChangeEvent, useState } from 'react'
import { VideoUploader } from '@api.video/video-uploader'
import Link from 'next/link'

export default function Home() {
  const [uploading, setUploading] = useState<boolean>(false)
  const [progress, setProgress] = useState<number>(0)
  const [videoId, setVideoId] = useState<string | undefined>(undefined)

  async function handleFile(event: ChangeEvent<HTMLInputElement>) {
    if (!event.currentTarget.files) return
    try {
      setUploading(true)
      setVideoId(undefined)
      const videoUploader = new VideoUploader({
        uploadToken: 'YOUR_UPLOAD_TOKEN',
        file: event.currentTarget.files[0]
      })
      videoUploader.onProgress(e => setProgress(Math.round(e.uploadedBytes * 100 / e.totalBytes)))
      videoUploader.onPlayable(e => setVideoId(e.videoId))
      await videoUploader.upload()
    } catch (error) {
      console.error('Error trying to upload a video:', error)
    } finally {
      setUploading(false)
    }
  }

  return (
    <main>
      <h1>Upload a video</h1>
      <input type='file' onChange={handleFile} />
      <div>
        {(uploading && progress < 100) && `Video uploaded at ${progress}%`}
        {(progress >= 100 && !videoId) && 'Wait a second...'}
        {videoId && 'Your video is ready 🎉'}
      </div>
    </main>
  )
}
As you can see, you will need an upload token to upload a new video. You can create and find yours here.
⚠️ You can also decide to use an API key or an access token in the TypeScript video uploader, but it’s strongly discouraged because you’re exposing sensitive information
Few things to notice here:
'use client': By default, the app directory’s components are server components. These components are great for rendering non-interactive content. However, if you want to allow client interaction in your component (React hooks, event listeners, browser-only APIs), you need to add the'use client'directive at the top of your component file.- Next
<Link />component: In Next.js 13, you don’t need to pass a<a>tag as children to the Link component. onProgressandonPlayableevents: our TypeScript video uploader allows you to track upload progress whenever the uploaded video is playable.
Congratulations! You now have implemented a video upload solution into a Next.js application 👏🏽 Pretty easy right? Let’s move on to the next part: display your video list.
Display a videos list with Next.js 13 🏄🏽
You can now upload videos to your api.video project. You can watch and edit them through your dashboard. You can also implement this feature in your application. Let’s implement it together 🧑🏽💻
- We need to use the api.video Node.js client to access our videos. Install it by running one of the following commands
npm i @api.video/nodejs-client
# or
yarn add @api.video/nodejs-client
# or
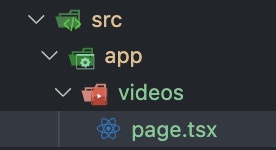
pnpm i @api.video/nodejs-client- Create a new videos directory under src/app/ and create a page.tsx file in it. In Next.js 13, pages that are created under the app directory need to be named page.tsx,js. Read more about it here.
- Edit your new src/app/videos/page.tsx file with the following code
import ApiVideoClient from '@api.video/nodejs-client'
import Link from 'next/link'

export default async function Videos() {
  const videoClient = new ApiVideoClient({ apiKey: process.env.API_KEY })
  const videos = await videoClient.videos.list()
  return (
    <>
      <div>Videos</div>
      {videos.data.length === 0 && <Link href="/">No videos! Upload one here!</Link>}
      {videos.data.map((video, i) => <Link key={i} href={`videos/${video.videoId}`}>{video.title}</Link>)}
    </>
  )
}
This component is a perfect example of a Server Component. Instead of using Next.js api directory or getServerSideProps to fetch our videos from api.video, we can directly do this from our component.
Congratulations! You displayed all your videos in seconds 🏎️
Playback a video with Next.js 13 📺
In any application, a video needs a container to be played, which is often called a player. In our video app, we will use the api.video React player to playback our videos.
We want to access and playback a video in two different ways:
- Once a new video is uploaded and playable, we want to display a player in the same view to playback it directly.
- If we go through our videos list, each item is a clickable link that redirects us to the video view, and thus the player.
- Install the React player package by running one of the following commands
npm i @api.video/react-player
# or
yarn add @api.video/react-player
# or
pnpm i @api.video/react-player- Replace your src/app/page.tsx (the uploader page) code with the one bellow
'use client'

import { ChangeEvent, useState } from 'react'
import { VideoUploader } from '@api.video/video-uploader'
import Link from 'next/link'
import ApiVideoPlayer from '@api.video/react-player'

export default function Home() {
  const [uploading, setUploading] = useState<boolean>(false)
  const [progress, setProgress] = useState<number>(0)
  const [videoId, setVideoId] = useState<string | undefined>(undefined)

  async function handleFile(event: ChangeEvent<HTMLInputElement>) {
    if (!event.currentTarget.files) return
    try {
      setUploading(true)
      setVideoId(undefined)
      const videoUploader = new VideoUploader({
        uploadToken: 'toyfPisYyGhC4sYqnxMzEYz',
        file: event.currentTarget.files[0]
      })
      videoUploader.onProgress(e => setProgress(Math.round(e.uploadedBytes * 100 / e.totalBytes)))
      videoUploader.onPlayable(e => setVideoId(e.videoId))
      await videoUploader.upload()
    } catch (error) {
      console.error('Error trying to upload a video:', error)
    } finally {
      setUploading(false)
    }
  }

  return (
    <main>
      <h1>Upload a video</h1>
      <input type='file' onChange={handleFile} />
      <div>
        {(uploading && progress < 100) && `Video uploaded at ${progress}%`}
        {(progress >= 100 && !videoId) && 'Wait a second...'}
        {videoId && 'Your video is ready 🎉'}
      </div>
      {videoId && <ApiVideoPlayer video={{ id: videoId }} style={{ width: 500, height: 300 }} />}
    </main>
  )
}
A video player will now appear when your uploaded video is ready to be played.
- Create a new directory
src/app/videos/[videoId]and a filepage.tsxin it, and add the following code to it
'use client'

import ApiVideoPlayer from "@api.video/react-player"

type PlayerViewProps = {
  params: { videoId: string }
}

export default function PlayerView({ params }: PlayerViewProps) {
  return <ApiVideoPlayer video={{ id: params.videoId }} style={{ width: 500, height: 300 }} />
}
The new app directory lets you create dynamic routes as previously. Here, we are reading the videoId URL parameter with the reserved params Next.js parameter and sending it to our React player.
- Go back to your videos list view and try to click on one of them. You should be redirected to the player view where your video can be read 🎉
We are excited to see the creative solutions built with api.video and Next.js 13! Join our community to share anything about video with other passionate people 💬
Follow our latest news by subscribing to our newsletter
Create your free account
Start building with video now


